

Before you start: Time Machine may ask to erase a new disk. Erasing permanently deletes everything on it. Use a disk with no files you need, or choose another disk.
If you are unsure what is on it, stop and check before continuing.
TL;DR
Use Time Machine with a compatible external drive, then leave it connected until the first backup finishes.
- Add the disk in System Settings > General > Time Machine.
- Check the menu for backup progress and the latest backup date.
- Confirm the backup completes before relying on it.
If you need to back up Mac files, Time Machine is a straightforward place to start.
It saves versions of your files to a separate disk, so you can recover an earlier copy if something disappears or changes.
iCloud and services such as Google Drive can keep selected files in sync across devices. A synced deletion can spread too, so treat sync as access and sharing, not as your only independent backup.
Below, I’ll show the Time Machine setup, how to confirm it ran, and which restore path fits your situation.
What you need before you back up
Use an external storage device that connects to a compatible Mac port, such as USB-C or Thunderbolt.
Apple recommends a backup disk with at least twice your Mac’s storage capacity, which leaves room for older file versions.
That is Apple’s recommendation, not a guarantee that every disk size will fit every person’s files.
A dedicated Time Machine disk is the clearest setup. Apple lists APFS or APFS Encrypted as the preferred format for a Time Machine backup disk.
If a disk already holds a Time Machine backup, do not erase it just to change its format. Apple’s backup disk requirements explain supported drives and formats.
If you choose Encrypt Backup, create a backup password and keep it somewhere you can retrieve later. You need that password to unlock the backup for recovery. This encrypts the backup disk.
It does not change FileVault or another encryption setting on your Mac.
Set up Time Machine on an external drive
1. Connect a drive you can safely dedicate to backups
Connect the external drive to your Mac. If this is a new disk, check that it is empty or that anything important has another verified copy before you continue.
If the disk already holds Time Machine backups, leave it as it is and select it through Time Machine settings.
2. Add the disk in System Settings
- Choose Apple menu > System Settings.
- Click General in the sidebar, then Time Machine.
- Click Add Backup Disk (or the add button), select the connected disk, then choose Set Up Disk if asked.
- Review any erase, existing-backup, space, or encryption prompt before choosing. If you see an erase prompt and are not certain the disk can be erased, cancel and select a different disk.

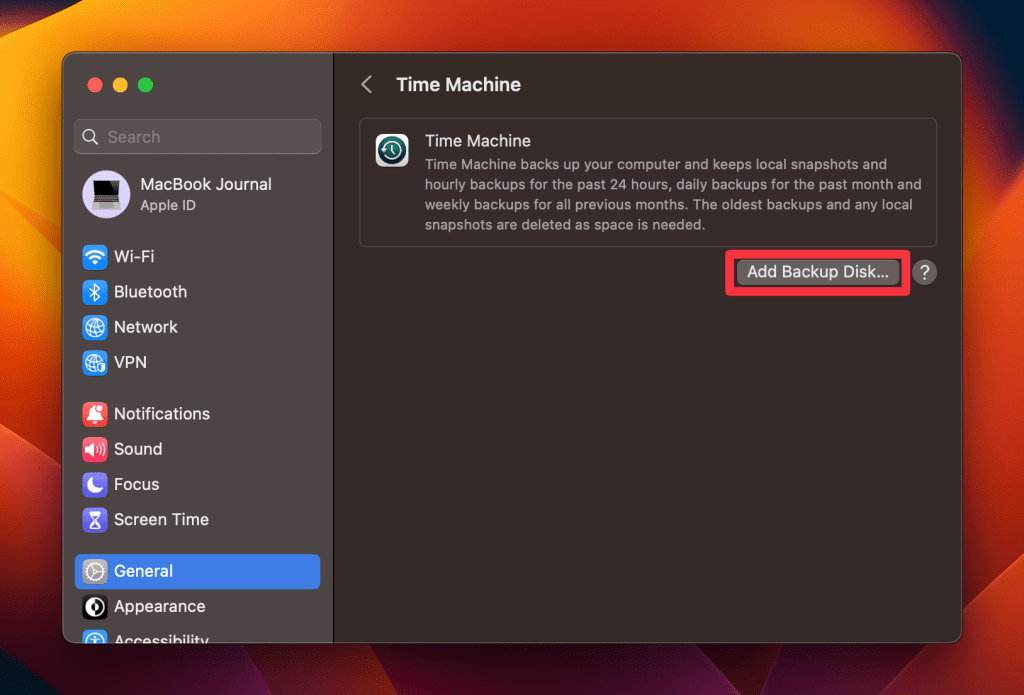
Apple’s setup steps list these prompts. The current Time Machine recovery guide also shows how to add the menu-bar icon if it is missing.
When Time Machine asks whether to encrypt the backup, choose based on who could access the physical disk. If you turn encryption on, save the backup password before proceeding.
Forgetting it can prevent you from opening the backup later.
3. Start the first backup and wait for it to finish
After setup, Time Machine starts backing up. To start one yourself, choose Back Up Now from the Time Machine menu.
Open that menu to see progress and, when it is idle, the date and time of the latest completed backup.
If the Time Machine icon is missing, choose Apple menu > System Settings > Control Center, scroll to Time Machine, and choose Show in Menu Bar.
The first backup can take a while, depending on how much data is on the Mac and the connection to the disk. You can keep using the Mac while it runs.
Leave the drive connected until the menu shows that the backup has finished. If you disconnect it later, Time Machine resumes its schedule when you reconnect it.
After the first backup, later runs save files changed since the previous backup.
Time Machine keeps older copies as space allows and removes the oldest backups when the disk is full, so no fixed amount of history is guaranteed.
How to check that your backup is useful
A backup is useful when you can identify a completed copy and recover what you need. Check the latest backup date in the Time Machine menu after the first run.
If it still reports progress, wait. If it shows an error or the date does not update after reconnecting the disk, use Apple’s Time Machine troubleshooting steps.
To test recovery, create a clearly named file with unimportant text in a folder included in your backup. Run another backup, wait for it to finish, and confirm the completed date. Delete only that test file, open its folder in Finder, enter Time Machine, select the backup from before deletion, and click Restore.
Apple says restored items return to their original location; open the file to confirm it came back. Do not test with an important file or erase the Mac.
Time Machine also saves local snapshots on APFS storage. Apple says it usually saves one about every hour and keeps it for 24 hours.
It also keeps an extra snapshot of the last successful Time Machine backup until space is needed.
These snapshots stay on the same storage as your original files, so they are useful for recent changes but do not replace an external or network backup. See Apple’s local snapshot details.
Choose the right way to restore your Mac files
To bring back one file or an older version
Open the folder where the file belonged, enter Time Machine, browse to the date and version you want, select the item, then choose Restore. Apple’s restore instructions cover individual files and earlier document versions.
If the Time Machine icon is missing, Apple’s current Spotlight recovery guide explains how to show it in the menu bar and browse backups.
To move your files to a replacement Mac
Use Migration Assistant during setup or later from Applications > Utilities. Connect the backup disk, choose the option to transfer from a Mac, Time Machine backup, or startup disk. Then select the backup and the information to move. Apple’s restore from a backup guidance explains the choices. The available steps can differ with the Mac and macOS version.
If the Mac will not start or its startup disk was replaced
If the Mac cannot start, Apple’s recovery route may require reinstalling macOS before restoring files. On Apple silicon, shut down and hold the power button until startup options appear; on Intel, restart and hold Command-R. Follow Apple’s Recovery and reinstall instructions for your Mac, then restore from the backup.
Use this route when the Mac cannot start or the startup disk needs repair or replacement.
When a manual copy or network backup makes sense
For a small set of folders, copy selected files to a separate external disk. This does not preserve Time Machine’s file history or create a ready-to-boot clone of the system. Keep the originals until you have opened the copied files and confirmed they are readable.
For a network backup, use another Mac set up as a Time Machine destination or a NAS that explicitly supports Time Machine over SMB. Apple says NAS compatibility depends on the device; check its documentation.
A USB disk plugged into an ordinary router is not automatically a supported Time Machine destination. Apple’s guide explains supported backup disks and sharing a Time Machine folder.
Keep iCloud Drive for syncing and access across your devices. Apple says changes such as adding, renaming, or deleting a file appear across devices.
For older versions and a separate recovery copy, use Time Machine or another backup you control. You can also read Apple’s explanation of how iCloud Drive syncs files.
Frequently Asked Questions
Can I keep using my Mac during the first Time Machine backup?
Yes. Apple says you can continue using your Mac while the first backup is underway. Keep the backup disk connected and wait for Time Machine to show completion before treating the first copy as ready.
Will Time Machine back up while the external disk is disconnected?
No. A disconnected disk cannot receive a backup. Apple says Time Machine resumes its backup schedule after you reconnect the disk, so check the latest completed date if it has been unplugged for a while.
Are local Time Machine snapshots enough if I do not have an external disk?
Local snapshots are stored temporarily on the same APFS storage as your originals. They can help recover a recent version, but a separate disk or supported network backup is needed to protect against loss of the Mac’s internal storage.
Can I use the same external disk for ordinary files and Time Machine?
Apple recommends using the Time Machine disk only for backups. On APFS, advanced users can create another volume, but both volumes share the disk’s available space. A separate backup disk is simpler to manage.
Can I restore just one deleted file from Time Machine?
Yes. Open the file’s folder, enter Time Machine, select a backup from before deletion, and click Restore. To test this, first include a disposable file in a completed backup, then delete and restore only that test file. Restored items return to their original location.
Can I use my Time Machine disk to set up a new Mac?
Yes. Migration Assistant can transfer files, apps, and a user account from a Time Machine backup to another Mac. The available choices depend on the Mac and macOS; Apple’s restore guide walks through the transfer.
Affiliate disclosure: MacBook Journal may earn a commission when you buy through links on this page, at no extra cost to you.
How helpful was this article?
Your feedback helps us improve our guides.