TL;DR
Mac running slow? Speed it up with these steps:
- Restart your Mac to clear memory and apps for better performance.
- Reduce startup apps to speed up boot time.
- Stop background tasks to free up resources.
- Delete files and empty Trash to free space.
- Clear cache files to boost performance.
Tried and Tested ✅: The methods and steps mentioned in this article have been tried and tested firsthand by Ojash Yadav on his MacBook Pro M3 and rechecked for errors on Hashir’s MacBook Air M2.
Recently, my Mac started slowing down, and the lag became impossible to ignore. I looked into it and found some simple fixes that worked. In this post, I’ll share the steps I used to speed up my Mac.
Did You Know? Macs need at least 10-15% of their total storage free to run efficiently. When your storage gets too full, it slows down your system as macOS can’t create the temporary files it needs.
Before We Begin
A slow-running Mac is a buzzkill to say the least. While there are plenty of methods to speed up a slow Mac, the quickest one is using MacKeeper, a Mac optimization software. MacKeeper has several features to give your Mac the boost it needs, including a cache cleaner, RAM freer, duplicates finder, and more.
Give Your Mac a Speed Boost With MacKeeper
MacKeeper is the ultimate solution to give your Mac a powerful speed boost. This comprehensive software suite is designed specifically for Mac users, offering a wide range of performance-enhancing tools and utilities.
With its intuitive interface and advanced optimization features, MacKeeper optimizes your Mac’s performance, cleans up junk files, and protects your system from malware, all in one convenient package.
Follow the steps below to use MacKeeper’s Memory Cleaner to free up the RAM on your Mac:
- Download and install MacKeeper on your Mac.
- Open MacKeeper and click Memory Cleaner under the Performance tab.

3. Click Open.

- Click Clean Memory.

- It will clean your Mac and free up available memory. You can see how much memory it freed under Last Cleanup.

How to Fix a Mac Running Slow
Why You Can Trust MacBook Journal ![]() We always conduct first-hand research and verify every method or solution we present, ensuring you receive reliable and effective advice. Learn more about our process.
We always conduct first-hand research and verify every method or solution we present, ensuring you receive reliable and effective advice. Learn more about our process.
Below, I’ve shared various troubleshooting steps to address the root causes of a slow Mac:
1. Restart Your Mac
Restarting your Mac clears memory and closes all running applications, boosting performance. You can restart your Mac by following these steps:
- Click the Apple menu in the top left corner of the menu bar.
- Select Restart from the drop-down menu.
- Click the Restart button on the pop-up window to confirm that you want to restart your Mac.

- Your Mac will restart.
2. Manage Login Items on Startup
Reducing the number of apps that launch at startup can speed up your Mac’s boot time. Here’s how to remove your login items on Mac:
- Click the Apple icon and select System Settings.

- Click General and select Login Items.

- Review the list of startup items and select the ones you don’t want to launch at startup.
- Next, click the small minus (-) button to remove the selected login items from the list.

- Close the window, and the changes will take effect the next time you restart your Mac.
Besides doing it manually, you can also automatically remove login items on your Mac using MacKeeper. Follow these steps to remove login items using MacKeeper:
- Download MacKeeper and install it on your Mac.
- Open Login Items under Performance in MacKeeper.

- Click Start Scan.

- Select unnecessary items from the list and click Remove Selected Items.

- Tap the Remove button on the pop-up.

- It will remove your selected items from the system startup list. You can click Rescan to repeat the process.

3. Limit Background Processes
Limiting unnecessary background processes frees up CPU resources and improves performance. Follow these steps to limit the number of background processes on your Mac:
Remember some processes are necessary for macOS and applications to run properly. Terminating critical processes can result in system instability or unexpected behavior.
- To access Activity Monitor, go to the Applications folder, locate the Utilities folder within it, and launch Activity Monitor by double-clicking it.
- You’ll find different categories in the Activity Monitor window, including CPU, Memory, Energy, Disk, Network, and Cache.

- Click the CPU tab and pay attention to processes utilizing a significant portion of system resources, such as those with high CPU usage.

- Choose a process consuming a significant amount of resources, and you’ll find comprehensive details about it in the lower section of the Activity Monitor window.

- If the process has a significant CPU load, you can quit by clicking the x button in the top toolbar.

- Click the Quit button on the confirmation dialog to terminate the selected process.

- After quitting a resource-hungry process, you will notice some improvement in your Mac’s performance.
4. Clean Up Your Hard Drive
Clearing unnecessary files from your hard drive creates space and enhances performance. Below, I’ve shared simple steps to clean up your Mac’s hard drive:
- First, identify which files you no longer need and can safely delete.
- Next, select these files, right-click them, and choose Move to Bin from the menu.

- Moving files to the Bin removes them from the folder but still uses disk space. To permanently delete them, right-click the Bin icon in the Dock and select Empty Bin.

5. Clear Cache Files on Mac
Removing cache files can free up space and resolve performance issues caused by outdated or corrupted data. Here are the steps to manually clear the cache files on your Mac:
Always back up your files before deleting or modifying system data like caches. It ensures you don’t accidentally lose important data.
- Click the Finder icon in the Dock to open a Finder window.

- In the menu bar, click Go and then Go to Folder.

- In the Go to Folder window, type the following path and press Enter:
~/Library/Caches
- Find the folder for the application you want to clear the cache for. Look for folders with the same name as the app.
- Right-click the folder and select Move to Bin from the menu.

- Click Empty Bin to delete the folder permanently.

- Restart your Mac to see if its speed improves.
Besides doing it manually, you can also automatically remove login items on your Mac using MacKeeper. Follow these steps to remove login items using MacKeeper:
- Download MacKeeper and install it on your Mac.
- Open Login Items under Performance in MacKeeper.
- Click Start Scan.
- Select unnecessary items from the list and click Remove Selected Items.
- Tap the Remove button on the pop-up.
- It will remove your selected items from the system startup list. You can click Rescan to repeat the process.
6. Declutter Your Desktop
A cluttered desktop can slow down your Mac by consuming system resources. Keeping your desktop organized not only boosts performance but also makes it easier to find files quickly. Here are simple steps to clean up your desktop:
- Reduce desktop files and folders to improve performance.
- Group similar items into folders.
- Delete unnecessary files by moving them to the Bin.
- Use the Dock for frequently accessed apps.
- Enable Stacks to auto-sort your desktop files.
7. Uninstall Unused Apps
Uninstalling unused apps can speed up a slow Mac by reducing the amount of disk space they occupy and freeing up system resources. When you uninstall applications you no longer use, you reclaim valuable disk space and give your Mac more breathing room to operate efficiently.
You can use Launchpad to uninstall unused apps on your Mac. Follow these simple steps to use Launchpad for app removal on your MacBook:
- Open Launchpad by clicking the Launchpad icon in the Dock or using the Mac keyboard shortcut key: F4.
- Navigate through the list of apps in Launchpad until you locate the app you wish to uninstall.
- Click and hold the app icon until it starts shaking, and an X icon appears on the top-left corner of the app icon. Click the X icon to initiate app deletion.
- A confirmation pop-up window will appear, asking you to confirm the deletion. Click the Delete button to confirm, and the app will be moved to the Bin in the Dock.

- After deleting the app, right-click the Bin icon in the Dock and select Empty Bin.

- Restart your Mac to ensure that all changes are applied.
Alternatively, you can use MacKeeper’s Smart Uninstaller to uninstall multiple unwanted apps in one go. Follow these steps to free your Mac of unwanted apps and boost its speed:
- Download and install MacKeeper on your Mac.
- After installation, launch MacKeeper and click the Smart Uninstaller in the left-hand menu.

- Click Start Scan.

- Select the applications you want to delete from the list and click Remove Selected.

- Tap the Remove button on the pop-up to confirm the deletion.

- MacKeeper will uninstall the apps and remove associated files and folders. You will get a Removal Completed notification. If you want to scan your Mac again, click Rescan.

8. Check for macOS Updates
Updating macOS ensures your Mac benefits from the latest performance improvements and bug fixes. If you want to update macOS on your Mac to speed up Mac running slow, here are the steps to follow:
- Click the Apple menu and select System Settings.

- Click General and select Software Update to open the updates menu.

- Your Mac will automatically scan for updates. If it is already running the latest macOS version, it will display its current system version. However, if an update is available, you can simply click the Update Now button.

9. Free Up RAM on Your Mac
Freeing up RAM improves your Mac’s speed, especially during memory-intensive tasks. Here’s how you can free up RAM on your Mac using Activity Monitor:
- Go to the Applications folder, open the Utilities folder, and double-click Activity Monitor to launch it.

- In the Activity Monitor window, click the Memory tab to view a list of processes and their corresponding memory usage.
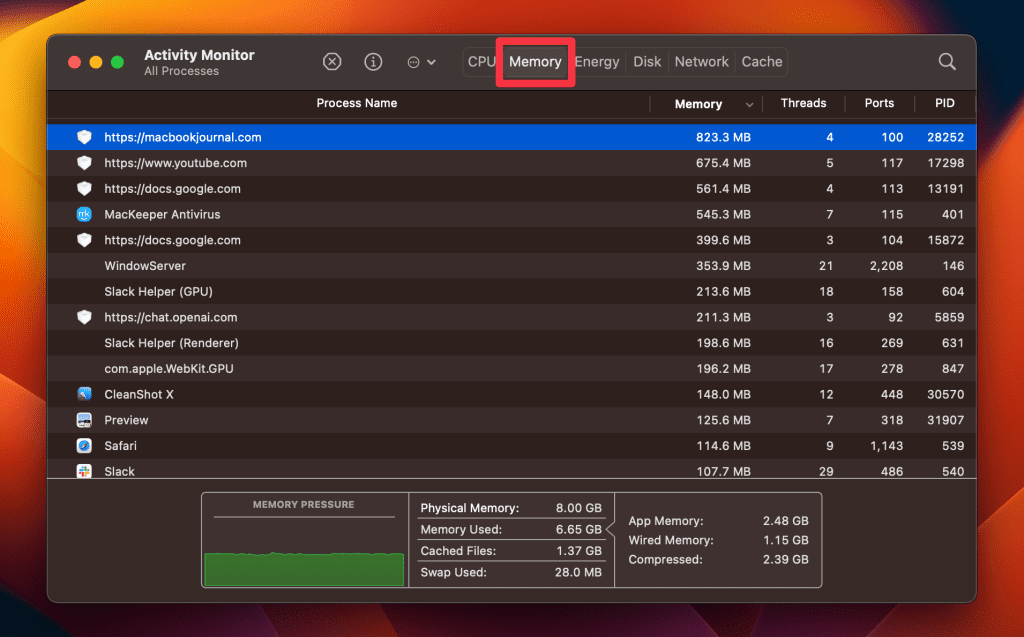
- The processes are sorted by the amount of memory they use, with the highest at the top. You can also sort them in your desired order by clicking the Memory filter.

- If you notice any unresponsive applications that are not closing through normal means, select the process and click the X button in the top toolbar.

- Click the Quit button on the pop-up window to terminate it.
Once you have quit memory-intensive applications, restart your Mac. Restarting clears out the RAM and improves performance.
10. Update All Apps
Keeping your apps updated fixes bugs and ensures they run efficiently. Follow these steps to update apps on Mac:
- Click the Apple menu in the top left corner of the screen and select App Store.

- Click the Updates tab in the App Store window.

- If updates are available, you will see a list of apps that can be updated.

- Click the Update button next to each app that has an update available.

This will update the selected app. Repeat the same steps for all apps.
If you’re looking for a one-click solution to keep your Mac apps up to date, consider using MacKeeper’s Update Tracker. Here’s how to use Update Tracker to update apps on macOS:
- Download and install MacKeeper on your Mac.
- Launch MacKeeper and click the Update Tracker tab in the left sidebar.
- Click Scan for Updates.
- MacKeeper will scan your Mac for outdated apps and display a list. To select an app, check the little box next to it or click Check All to select all apps.
- Click Update All.
- Wait for the updates to complete. Depending on the number and size of updates, this can take a while.

- You’ll get an Update Completed notification. Click Rescan if you want to update more apps.
11. Run a Virus Scan on Your Mac
Scanning for malware removes harmful software that can slow down your Mac. Here’s how you can run a virus scan on your Mac using MacKeeper:
- Download and install MacKeeper.
- Launch MacKeeper and navigate to the Antivirus tab in the left sidebar.

- Initiate an instant virus scan by clicking the Start Scan button.

- If viruses are detected during the scan, click the Fix Items button to resolve the issues.
- If your system is threat-free, you’ll see a No threats found message. You can tap the Restart button to run the scan again.

- Enable real-time antivirus protection to safeguard your Mac from future threats by clicking the Enable button.

After you have configured your security settings, MacKeeper will continue to operate in the background, diligently scanning for threats and actively blocking any malicious activity.
What Else Can MacKeeper Do?
Besides removing junk files, freeing up RAM, deleting login items, and scanning your Mac for viruses, MacKeeper can delete duplicate files on your Mac, block annoying ads, and provide a secure connection to your Mac with its VPN. Read more about its amazing features in my MacKeeper review.
11. Close Extra Browser Tabs
Closing unused browser tabs helps free up memory and improve your Mac’s performance. Follow these steps:
- Look for tabs you aren’t using or those that are using more resources, like video streams or complex apps.
- Click the small x on the left side of the tab.
- Or, press Command ⌘ + W to close the active tab.

12. Reset the SMC
Resetting the System Management Controller (SMC) can help fix issues like slow performance, power, and battery problems, but only on Intel Macs. On Apple Silicon Macs (M1, M2, M3, and newer), the SMC is integrated and resets automatically during a restart, so you don’t need to do anything.
For more detailed steps, refer to my full guide on resetting the SMC.
💡 Tip for Older Macs
Upgrading the RAM on older Macs can give a significant performance boost if your system is running slow. Check how much RAM your Mac is using via Activity Monitor and see if an upgrade is possible. Not all Mac models allow for RAM upgrades, so confirm compatibility before purchasing.
Mac Running Slow? Never Again!
By following the tips I shared in this guide, you can make sure never to have a sluggish Mac again. However, if you need more help, here are a few tips to optimize your Mac’s performance:
- If issues persist, try clearing your Mac’s system data.
- Regularly clear your browser cache to maintain good performance.
- Always empty the trash to delete files and free up space permanently.