TL;DR
To convert HEIC to JPG on Mac:
- Open the Photos app and select the HEIC image.
- Go to File > Export > Export 1 Photo.
- Choose JPEG as the format and click Export.
- Select a destination and click Export again.
Tried and Tested ✅: The methods and steps mentioned in this article have been tried and tested firsthand by Ojash Yadav on his MacBook Pro M3 and rechecked for errors on Hashir’s MacBook Air M2.
Running into issues trying to open or share HEIC photos is common, but after searching for solutions, I discovered some built-in tools on Mac that make converting them to JPG super simple. Here’s what worked for me.
Remember, while JPG is more universally accepted, it doesn’t retain the image quality as well as HEIC, especially after multiple edits. So, choosing the right format is essential for your needs!
How to Convert HEIC to JPG on Mac
Why You Can Trust MacBook Journal ![]() We always conduct first-hand research and verify every method or solution we present, ensuring you receive reliable and effective advice. Learn more about our process.
We always conduct first-hand research and verify every method or solution we present, ensuring you receive reliable and effective advice. Learn more about our process.
Below, I’ve shared the step by step instructions to convert HEIC to JPG using three different methods:
1. With Photos
Photos app provides a quick and straightforward way to convert HEIC files to JPG while managing and editing your images. Let’s see how you can use the Photos app to convert HEIC to JPG on Mac:
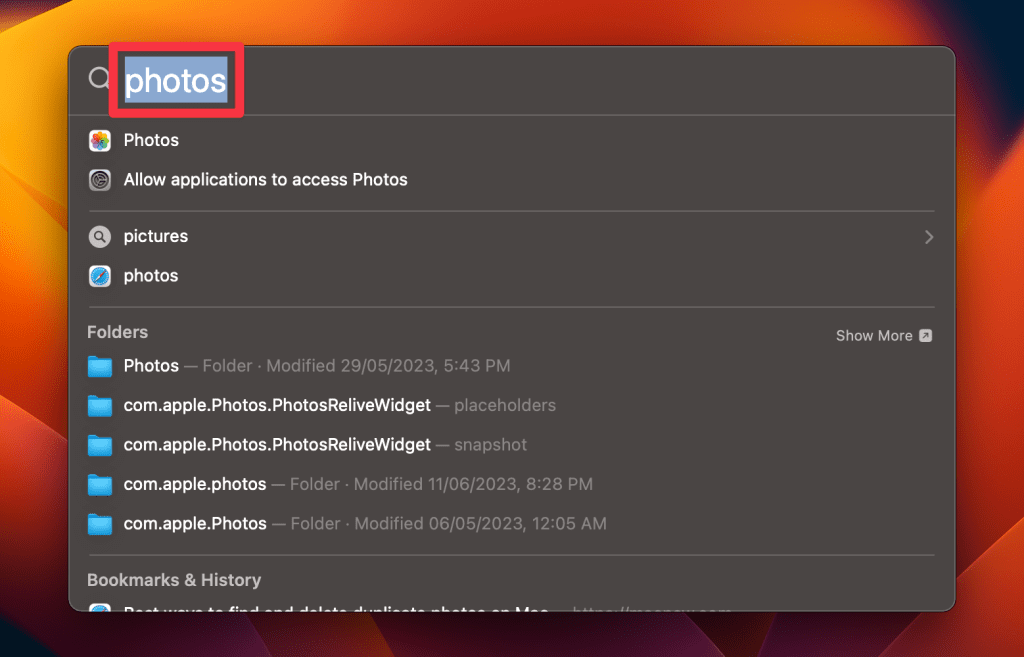
- Search for Photos in the Spotlight Search.
- Open the Photos app and select the HEIC photo you want to convert.

- Click File in the menu bar, hover over Export, and choose Export 1 Photo.

- Select JPEG as the Photo Kind and click Export.

- Select a destination and click Export.

- The photo will be exported in JPEG format.

2. With Preview
Preview not only allows you to view files but also easily converts HEIC images to JPG on your Mac without additional software. Below are the detailed steps to convert HEIC to JPG on Mac using Preview:
- Open the HEIC file with Preview.

- Click File in the menu bar and select Export.

- Choose JPEG as the output format and select the quality.
- Pick a destination, rename the file if needed, and click Save.

3. With Automator
Automator simplifies bulk HEIC to JPG conversions by creating a Quick Action, enabling effortless conversions with just a right-click. Here’s how:
- Launch Automator by going to Finder > Applications > Automator.

- Open Automator and create a new document by clicking the New Document button.

- In the next window, choose Quick Action and click Choose.

- Next, set Workflow receives current to image files.

- In the Actions panel on the left, search for Change Type of Images and drag it to the workflow area.

- In the workflow area, set the image type to JPEG.

- Click File in the menu bar and select Save to save the Quick Action.

- Give the Quick Action a relevant name and click Save.

- Right-click a HEIC file, hover over Quick Actions, and select the action you just created (HEIC to JPEG in my case) to convert the image to JPG.

How to Batch Convert HEIC to JPG on Mac
Batch converting allows you to convert many files at once, saving you time and clicks. Here’s how to batch convert HEIC to JPG on Mac:
- Open the folder with your HEIC files.
- Select all the files you want to convert by pressing Command ⌘ + A.

- Right-click the files and hover your mouse over Quick Actions in the context menu. Then, select Convert Image.

- A new window will appear. Select the file format (i.e. JPEG in this case), choose the image size, and click Convert to JPEG.

💡Did you know that HEIC files can store multiple images, like bursts or live photos, in a single file, while JPG is limited to just one? HEIC also offers higher quality with smaller file sizes, but it’s not universally supported yet, which is why converting to JPG is often necessary.
Convert and View Your Photos in JPG on Mac
Converting HEIC files to JPG on your Mac is simple using built-in tools like Photos, Preview, and Automator. Choose the method that suits your needs and enjoy hassle-free file conversions.
Here are some more tips for you:
- You can easily check image dimensions in Finder using options like Get Info or preview pane.
- You can capture any screenshot on your Mac with simple shortcuts.
- Access iCloud photos on Mac to organize and avoid duplicates.