TL;DR
To fix the Mac not connecting to Wi-Fi issue:
- Turn the Wi-Fi off and on to refresh the connection.
- Restart your Mac to resolve temporary Wi-Fi glitches.
- Make sure your network is visible, and you’re within range.
- Restart your router by unplugging it for 30 seconds and plugging it back in.
Tried and Tested ✅: The methods and steps mentioned in this article have been tried and tested firsthand by Ojash Yadav on his MacBook Pro M3 and rechecked for errors on Hashir’s MacBook Air M2.
If your Mac isn’t connecting to Wi-Fi, don’t stress—I’ve faced the same issue. After trying a few different fixes, I found simple steps that worked. Here’s how you can get back online quickly.
Basic Troubleshooting Steps to Try Before
If your Mac is not connecting to Wi-Fi, there are several basic troubleshooting steps that you can take to fix the issue:
- 🔄 Toggle Wi-Fi Off and On: Turn Wi-Fi off, wait a few seconds, then turn it back on to reset the connection.
- 🔁 Restart Your Mac: A quick restart can fix temporary Wi-Fi issues.
- 📶 Check Your Wi-Fi Network: Ensure your network is visible and within range. Move closer if needed or try another network.
- 🔌 Restart Your Modem and Router: Unplug them for 30 seconds, plug them back in, and wait for them to fully restart before reconnecting.
Tip🔄 : Always ensure that your macOS is up to date. Sometimes, connectivity issues are resolved by simply updating to the latest version of macOS.
Advanced Methods to Fix Mac Not Connecting to Wi-Fi
Why You Can Trust MacBook Journal ![]() We always conduct first-hand research and verify every method or solution we present, ensuring you receive reliable and effective advice. Learn more about our process.
We always conduct first-hand research and verify every method or solution we present, ensuring you receive reliable and effective advice. Learn more about our process.
If the basic troubleshooting methods didn’t work, here are some effective advanced methods you can use to fix Mac not connecting to Wi-Fi issue:
1. Forget Wi-Fi Network and Rejoin
Reset the saved network settings by forgetting and rejoining the Wi-Fi network. Here are the steps to forget a Wi-Fi network and rejoin it on a Mac:
- Click the Apple Icon from the menu bar on the top of your screen and select System Settings.
- Select Wi-Fi from the list on the left-hand side in System Settings.

- Click the Details button next to the Wi-Fi’s name.
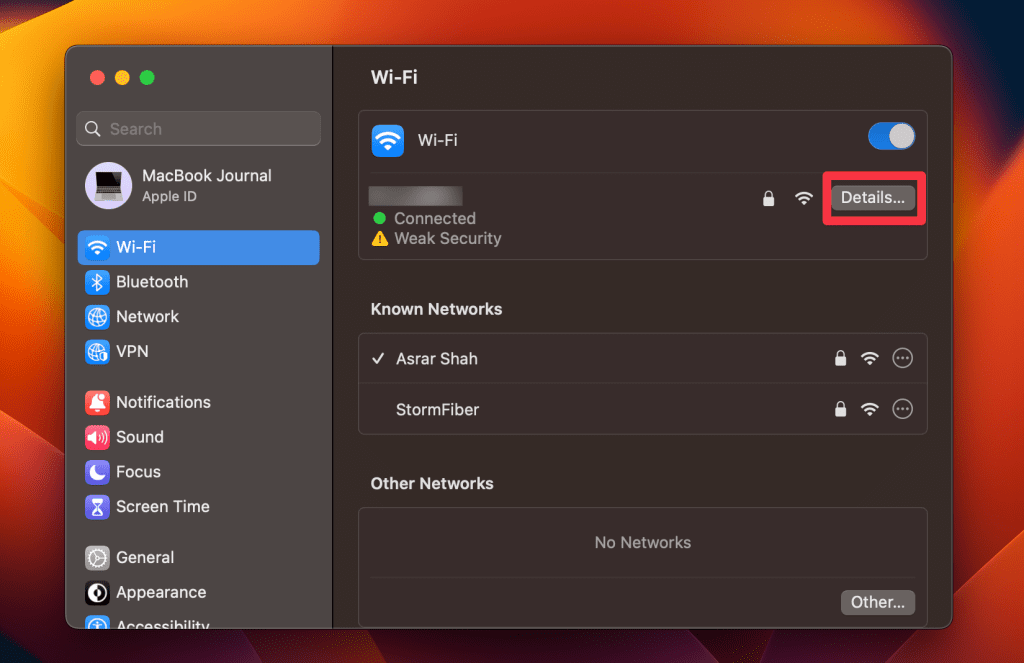
- In the new window, click the Forget This Network button at the bottom.

- Enter your administrator username and password, and click OK.

- Click Remove on the warning prompt to remove the selected Wi-Fi connection from your list.

- To rejoin the same Wi-Fi network, click the Wi-Fi icon in the menu bar again and tap the Connect button next to the network name in the list of available networks.

- When prompted, enter the Wi-Fi network password and click OK to connect.

2. Renew DHCP Lease
Refresh your IP address by renewing the DHCP lease to resolve connection conflicts. Here are the steps to renew the DHCP lease on a Mac:
- Click the Wi-Fi icon in the menu bar at the top of your screen.

- Select your desired Wi-Fi network from the list.

- It will open the Network Settings window. Click the Details button next to your Wi-Fi name.

- Click the TCP/IP tab in the Advanced Wi-Fi settings window.

- Click the Renew DHCP Lease button next to DHCP lease.

- Click the Apply button on the pop-up window to save your changes.

- Try connecting to the Wi-Fi network again by clicking the Wi-Fi icon in the menu bar and selecting the network from the list of available networks.
- Enter the Wi-Fi network password when prompted and click the Connect button to connect.
3. Configure DNS Settings
Update the DNS settings to a public DNS server like Google’s (8.8.8.8) or Cloudflare’s (1.1.1.1) for improved connectivity. Here are the steps to configure DNS settings on a Mac:
- Click the Apple menu in the top-left corner of your screen and select System Settings.
- In the System Settings window, select Wi-Fi in the left sidebar.
- It will open the Network Settings window. Click the Details button next to your Wi-Fi name.

- In the Advanced Wi-Fi settings window, select the DNS tab.
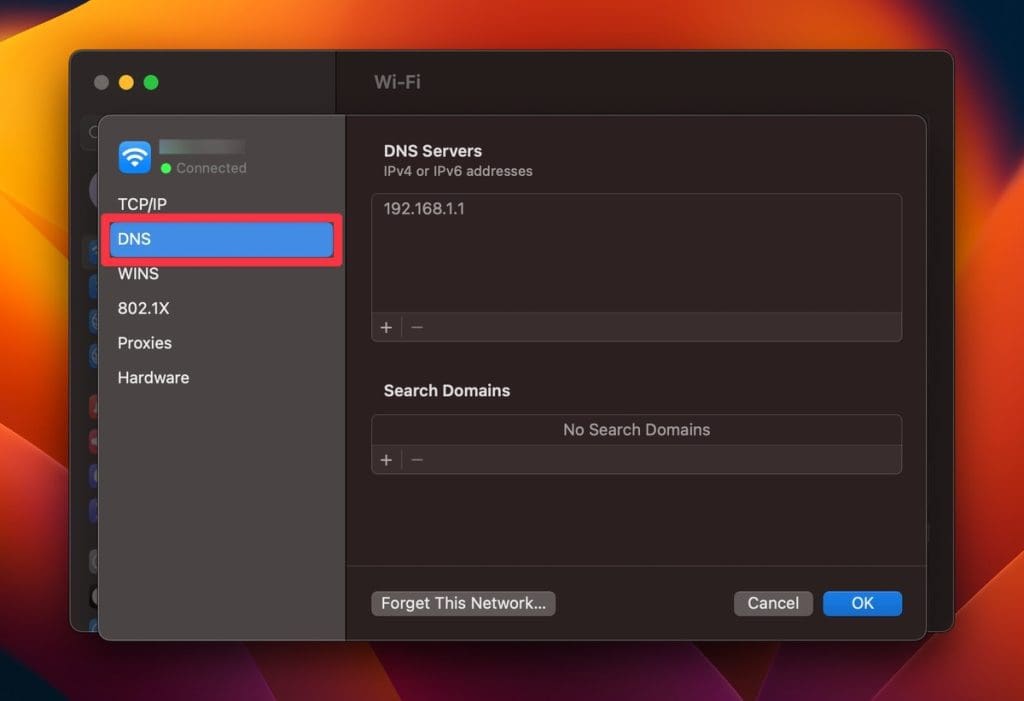
- Click the + button under the list of DNS Servers to add a new DNS server.

- Enter the IP address of a public DNS server, such as Google’s Public DNS (8.8.8.8) or Cloudflare DNS (1.1.1.1). Click OK.

- Try connecting to the Wi-Fi network again by clicking the Wi-Fi icon in the menu bar and selecting the network from the list of available networks.
- Enter the Wi-Fi network password when prompted and click the Connect button to connect.
4. Create a New Network Location
If you’re still experiencing issues with your Mac not connecting to a Wi-Fi network, creating a new network location might help resolve the problem. Here are the steps to create a new network location on a Mac:
- Click the Apple menu in the top-left corner of your screen and select System Settings.
- In the System Settings window, click Network.

- In the Network window, click the … icon in the bottom-right corner, select Locations > Edit Locations…

- Click the + icon in the new window.
- Type the name of the new location and click Done.

- Enter your administrator username and password for Mac and click Unlock.

- Try connecting to the Wi-Fi network again by clicking the Wi-Fi icon in the menu bar and selecting the network from the list.
- When prompted, enter the Wi-Fi network password and click the Connect button to connect.
📞 If none of these solutions work, there might be a deeper issue with your Mac’s hardware. In such cases, consulting with Apple Support is your best option.
Preventing Wi-Fi Connectivity Issues on Mac
Preventing Wi-Fi connectivity issues on your Mac can save you time and effort. Here are some tips for maintaining a stable Wi-Fi connection:
- Fix slow internet on Mac by checking network settings, restarting the router, and limiting background app usage.
- Keep your macOS up to date to avoid network compatibility issues.
- Reset network settings to clear conflicting configurations and start fresh.