TL;DR
To update macOS on your Mac:
- Open System Preferences from the Apple menu.
- Select Software Update.
- Check Automatically keep my Mac up to date.
Tried and Tested ✅: The methods and steps mentioned in this article have been tried and tested firsthand by Ojash Yadav on his MacBook Pro M3 and rechecked for errors on Hashir’s MacBook Air M2.
Getting macOS updates right doesn’t have to be a struggle. With a few key steps, you can make sure the update goes smoothly and avoid common issues that trip people up
Preparing Your Mac for an Update
Before you update macOS, take a few steps to get your Mac ready:
- Back Up Your Data: Always back up your data before a macOS update. While updates are usually safe, unexpected issues like power outages or errors can occur. A backup ensures you can restore files if anything goes wrong. Check out my guide on using Time Machine for backups.
- Free Up Disk Space: Make sure you have enough free storage for the macOS update. Low space can lead to failed installations or slow performance.
- Ensure Compatibility with Your Mac Model: Verify that your Mac supports the latest macOS version. Check the compatibility list on Apple’s website or go to Apple logo > About This Mac > Overview for your Mac’s details.
- Check for Pending Software Updates: Update your apps and software beforehand to avoid compatibility issues with the new macOS. Outdated apps might not work smoothly with the upgrade.
3 Best Ways to Update macOS on Your Mac
Here are the three best ways to update macOS on your Mac:
1. Update macOS Automatically
Turn on automatic updates to keep your Mac secure and always up to date without extra effort. Here is how to set up automatic updates:
- Click the Apple logo in the top-left corner and select System Settings.
- Click on Software Update.

- Click on small i icon in front of Automatic Updates.
- Toggle on Install MacOS updates to enable auto download and install available updates.

2. Manually Update macOS
If you prefer to choose when to install updates, you can manually update macOS. This lets you start the update when it’s convenient for you. Here is how to manually update macOS:
- Open System Settings by clicking the Apple logo and selecting System Settings.
- Click on Software Update.
- macOS will check for available updates. If there’s an update, you’ll see a button that says Update Now. Click it to begin.
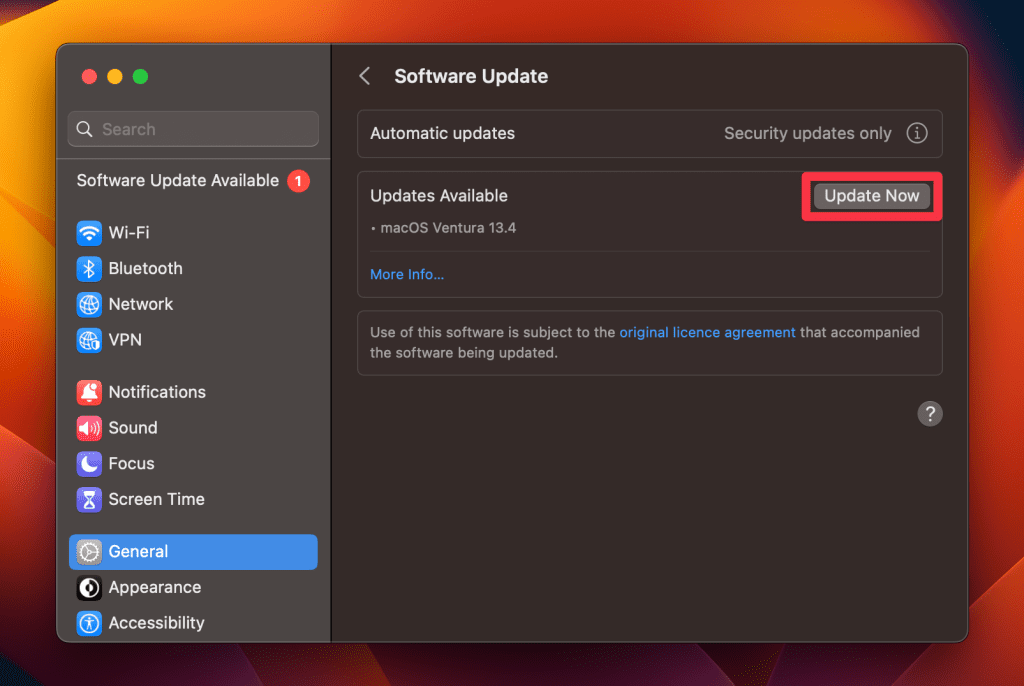
- Follow the on-screen instructions to complete the update. Your Mac may need to restart to finish installing the update.
3. Using macOS Recovery to Install Updates
Use macOS Recovery to install updates if you’re facing issues with the usual update methods. Here is how to update macOS using macOS recovery:
- Restart your Mac, then immediately press and hold Command + R until you see the Apple logo.

- When the macOS Utilities window appears, select Reinstall macOS and click Continue.

- Follow the on-screen instructions to reinstall the latest version of macOS compatible with your Mac.
- Once the installation completes, your Mac will restart with the updated system.
💡Did You Know? – Updating your macOS not only provides new features but also enhances security by patching vulnerabilities. Regular updates help protect your Mac from the latest threats.
Get Ready to Explore New Features After macOS Update
Now that you know how to update macOS on your Mac, you may need to learn more about macOS features to get the most out of your device. Here are some things you can try after updating your macOS:
- Remember, updating macOS doesn’t automatically update your apps; keeping apps updated ensures smooth compatibility.
- If an update gets stuck or corrupt, reinstalling macOS can often resolve the issue.
- If your Mac is running slow after an update, try troubleshooting by restarting your system, clearing the cache, freeing up RAM, and more.