TL;DR
To upgrade your Mac RAM, follow these steps:
- Confirm your Mac’s RAM type and upgrade limits.
- Gather tools: screwdrivers, grounding strap, and clean workspace.
- Back up data with Time Machine.
- Unscrew the bottom cover to open your Mac.
- Release old RAM and insert new ones at 45°, then press until they click.
- Reassemble your Mac and power it on.
Tried and Tested ✅: The methods and steps mentioned in this article have been tried and tested firsthand by Ojash Yadav on his MacBook Pro M3 and rechecked for errors on Hashir’s MacBook Air M2.
RAM is essential for your Mac’s performance, enabling smooth multitasking. If your Mac struggles with insufficient RAM, upgrading can boost speed and efficiency. Here’s how to upgrade it easily!
Which Mac Models Allow RAM Upgrades?
Why You Can Trust MacBook Journal ![]() We always conduct first-hand research and verify every method or solution we present, ensuring you receive reliable and effective advice. Learn more about our process.
We always conduct first-hand research and verify every method or solution we present, ensuring you receive reliable and effective advice. Learn more about our process.
Not all Macs allow RAM upgrades. For example, most new MacBooks, like the Air, have non-upgradable built-in RAM. Here’s a list of all Mac models that allow RAM upgrades and the ones that don’t:
| Mac Model | RAM Upgradeability |
|---|---|
| MacBook Pro 17″ (All Models) | Yes |
| MacBook Pro 15″ ( 2008–2012 Models) | Yes |
| MacBook Pro 13″ (2009–2012 Models) | Yes |
| MacBook (2008–2011 Models) | Yes |
| Mac Pro (All Models) | Yes |
| iMac Retina 4K 21.5″ (2019) | No |
| iMac Retina 4K 21.5″ (2017) | No |
| iMac 21.5″ (Late 2012–2017 Models) | No |
| iMac Pro (All Models) | Yes* |
| Mac mini models (2010–2012 Models) | Yes |
| Mac mini (2023) | No |
| Mac mini (2020) | No |
| Mac Pro (2019) | No |
| Mac mini (2014) | No |
| Mac mini (2006–2009 Models) | Yes* |
| Mac mini Original | Yes* |
*Upgradeability in these models may be limited, and upgrading the RAM could be more difficult or require professional assistance.
Since late 2020, Macs with Apple Silicon M1 chips have non-upgradable integrated RAM. Always check your model to confirm upgrade options.
How to Upgrade Your Mac RAM: 7 Steps
Upgrading your Mac RAM involves a lot of technical steps, and you need to be careful when performing this procedure. Any damage to the components or improper installation of the RAM modules can result in severe damage to your Mac.
Follow the procedure below to upgrade your Mac RAM successfully.
1. Identify your Mac Model
The first step in upgrading your Mac RAM is identifying your Mac model. To identify your Mac model, follow these steps:
- Click the Apple logo and select About This Mac.
- The new window will display your Mac’s model name, such as MacBook Pro or MacBook Air (Retina, 13-inch, Mid 2014).

- Note your Mac’s release year, displayed in the same window.
- Once you have identified your Mac model and year, check for RAM upgrade compatibility in the section above or on Apple’s official website.
- Some Macs have RAM soldered to the motherboard and cannot be upgraded, while others have slots for adding additional RAM. Checking for compatibility will ensure you save time and money on an impossible RAM upgrade on your Mac.
2. Choose the Right RAM
After confirming your Mac’s upgradeability, select the right RAM type, speed (MHz), and maximum capacity. Check Apple’s documentation or use tools like Crucial System Scanner for recommendations. Buy from a trusted vendor for quality and compatibility.
3. Gather the Necessary Tools
Before upgrading your Mac’s RAM, gather these tools to avoid interruptions:
- 🛠️ Screwdrivers: A set of Phillips and Torx drivers to open your Mac and remove RAM.
- ⚡ A Grounding Strap: Wear a grounding strap or touch a grounded metal surface before handling electronic components.
- 🧹 A Clean, Flat Surface: You will need a clean, flat surface to work on while upgrading your Mac’s RAM.
- 💾 The New RAM: You will need the new RAM that you have purchased to replace the existing RAM.
4. Backup Your Data
Back up your Mac to protect your data and easily restore it if something goes wrong during the RAM upgrade. Here’s how to use Time Machine to backup your data:
- Connect an external hard drive to your Mac.
- Open System Settings from the Apple menu.
- Click General and select Time Machine.

- Give access to Time Machine for backing up your data using your Mac password or Touch ID.

- Tap the Add Backup Disk button and choose the external hard drive you connected.
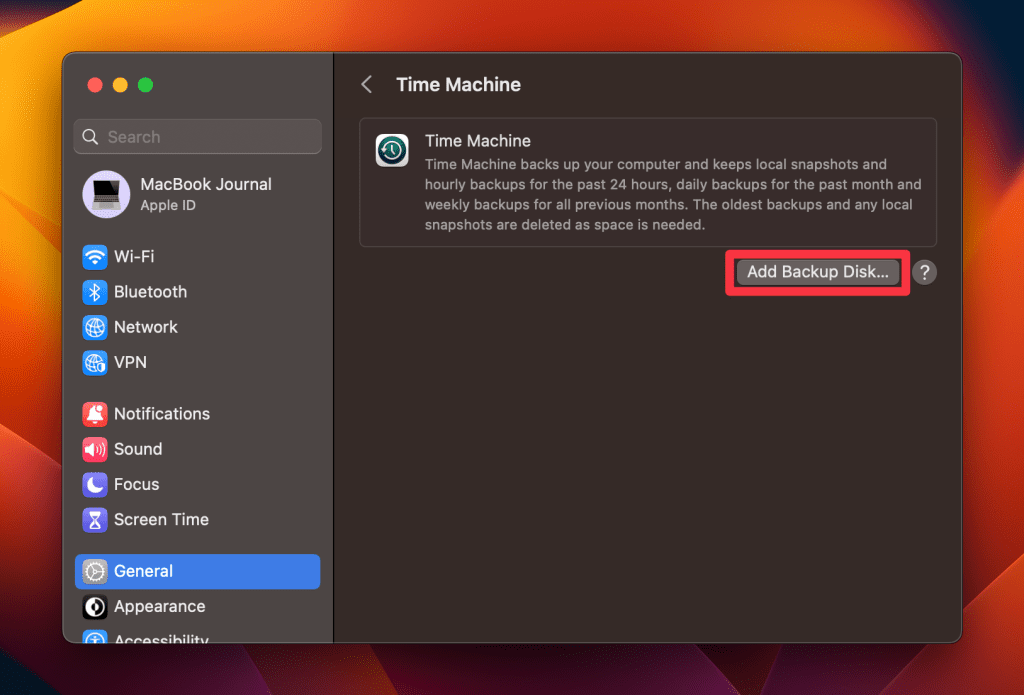
- Click Use Disk, and it will start backing up your data to the external drive.
5. Open Your Mac
Here’s how you can open your Mac to upgrade its RAM:
🚨 Be aware that opening your Mac and performing any hardware modifications may void your warranty or AppleCare coverage. If your Mac is still under warranty, contact Apple Support for assistance with memory upgrades.
- Shut down your Mac and unplug it from the power source. Also, unplug the Ethernet cable, USB cables, security lock, and other cables to avoid damaging the device.
- Turn your Mac over and locate the 10 screws on the bottom. Use a screwdriver to remove the screws.

- Carefully remove the back cover of your Mac.
6. Remove Existing Memory
- Locate the RAM slots on your Mac’s logic board.
- To release the memory module from its slot, push the levers on both sides of the module outward. The memory will pop up at an angle.

- Look for the half-circle notches before removing the memory. If you cannot find them, try pushing the levers outward again.
- Grasp the memory module by its notches and extract it from the slot. Remove the other memory module as well.
7. Install New RAM
- Insert the new RAM module into the slot at a 45-degree angle.

- Align the notch on the gold edge of the module with the notch in the bottom memory slot. Angle the card and insert the memory into the slot.
- With two fingers, apply firm, even pressure to push down on the memory module until you hear a click, indicating the correct installation.
- Replace the back cover of your Mac and screw it back in place.
- Plug in your Mac and turn it on to ensure the new RAM is installed correctly.
Congratulations! You have successfully upgraded your Mac’s RAM.
Upgrade Your Mac RAM Like a Pro
Upgrading RAM is a time-consuming procedure and it may not always be possible. If you want to keep your system performing well without a RAM upgrade, follow these tips:
- Uninstall unused apps on your Mac to reduce the load on your system.
- Remove cache files on your Mac to reduce the strain on your RAM.
- Free up space on your Mac hard drive to avoid performance issues.