TL;DR
- Time Machine auto-backs up your Mac, saving versions and supporting external storage, free with macOS.
Key Points
- Time Machine keeps version history to restore files or the entire system.
- It supports backups to external drives and network storage for flexibility.
- The interface is user-friendly and easy to set up for all users.
- Common issues like slow backups or disk errors can be fixed by restarting, checking connections, or consulting Apple support.
Tried and Tested ✅: The methods and steps mentioned in this article have been tried and tested firsthand by Ojash Yadav on his MacBook Pro M3 and rechecked for errors on Hashir’s MacBook Air M2.
Losing an important file is a nightmare. Use Time Machine to Back Up Your Mac and create automatic backups, ensuring your data is safe—it’s like a time-traveling superhero for your Mac!
Why Use Time Machine to Back Up Your Mac?
Using Time Machine to Back Up Your Mac for several compelling reasons:
- ⚙️ Effortless Automation: Time Machine backs up automatically, running in the background.
- 🕰️ Version History: Retrieve old or deleted file versions easily.
- 💻 System Restore: Restore your entire system on failure or a new Mac.
- ☁️ External & Network Backup: Supports external drives and network storage.
- 🍏 Integrated & Free: Comes with macOS, no extra cost or tools needed.
- 👥 Easy to Use: Simple setup and intuitive for everyone.
How to Use Time Machine to Back Up Your Mac: 3 Quick Steps
Why You Can Trust MacBook Journal ![]() We always conduct first-hand research and verify every method or solution we present, ensuring you receive reliable and effective advice. Learn more about our process.
We always conduct first-hand research and verify every method or solution we present, ensuring you receive reliable and effective advice. Learn more about our process.
Here are three simple steps to back up your Mac.
Step 1: Connect a Storage Device for Backup
Follow these steps to connect a storage device to your Mac before backing up:
- Choose an external storage device with sufficient capacity to handle your Mac’s data. It could be an external hard drive, USB drive, or a network-attached storage (NAS) device.
- Connect the selected storage device to your Mac using the appropriate connection method (USB, Thunderbolt, etc.).
- Once connected, a prompt should appear on your Mac asking if you want to use the device for Time Machine backups.
- If the prompt appears, confirm you want to use the connected device for Time Machine backups.
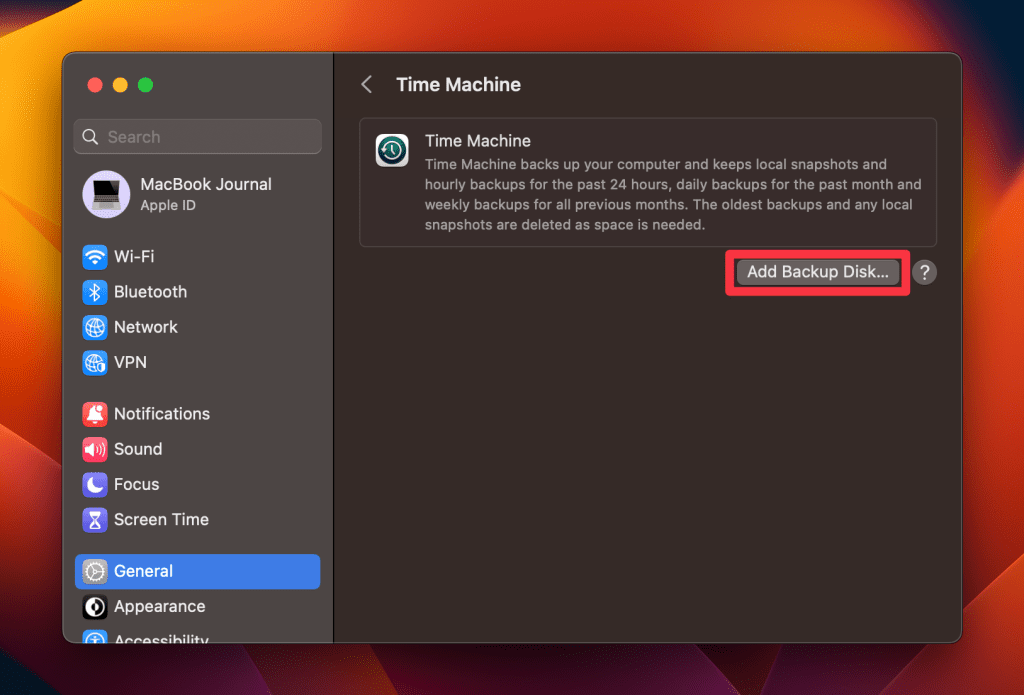
- If the prompt doesn’t appear, go to System Settings > Time Machine > Add Backup Disk, and manually select the connected storage device.
Step 2: Set Up Time Machine
Here’s how to set up Time machine on your Mac:
For macOS Ventura or Later
- Navigate to Apple menu > System Settings.
- Click General in the left sidebar and select Time Machine to the right.

- To select your external storage device as your backup disk, press the add button + and follow the onscreen instructions.
For Earlier Versions of macOS
- Head to Apple menu > System Preferences.
- Then, select Time Machine.
- Click Select Backup Disk and follow the onscreen guidelines.
Step 3: Use Time Machine to Back Up Your Mac
With Time Machine set up, backups start automatically every hour when the disk is connected. Here’s how to back up your Mac:
1. Automatic Backups
Once you pick your storage device in Time Machine settings, Time Machine gets to work and starts making regular backups all by itself.
2. Manual Backups
If you want to make a backup right away and not wait for the next automatic one, just select Back Up Now from the Time Machine menu in the menu bar.
3. Check Backup Status
Check your backup progress in the Time Machine menu. It shows current backup progress or the time of the last backup. You can also skip an ongoing backup.
How to Restore Mac from Time Machine
Restoring your Mac from a Time Machine backup is a straightforward process. Here’s a step-by-step guide to restore your data from a Time Machine back up:
- Shut down your Mac.
- Turn it back on and immediately hold down Command ⌘ + R until you see the Apple logo or a spinning globe.

- Release the keys when you see the macOS Utilities window.
- In the macOS Utilities window, select Restore From Time Machine Backup and click Continue..

- Choose the backup source, which is the storage device where your Time Machine backups are saved, and click Continue.
- You’ll see a list of available backups organized by date and time.
- Select the backup you want to restore from and click Continue.
- Select the destination where you want to restore your backup, typically your Mac’s main hard drive.
- Click Restore or Continue.
- The restoration process will begin. This may take some time, depending on the size of the backup.
- Once the restoration is complete, your Mac will restart.
- After restarting, the Setup Assistant will appear.
- Follow the on-screen instructions to complete the setup of your Mac.
Back Up Your Mac Data Using Time Machine
Backing up your Mac with Time Machine is easy—follow this guide to set it up and secure your data. But before you go, here are some more tips to keep in mind:
- Data backups are crucial because they can help you access accidentally deleted data. Learn how to restore deleted files on Mac using Time Machine.
- Time Machine backups can take up a lot of space. If you don’t need all backup versions, you can delete old Time Machine back ups on your Mac.
- While Time Machine is a reliable backup solution, you can also try other ways to back up your data on macOS.