



TL;DR
Back up the photo library independently before merging or deleting duplicates.
- With iCloud Photos, a deletion syncs to other devices using it.
- Recently Deleted is temporary recovery, not a backup.
- Review the selected copies before confirming a merge or deletion.
Sources: iCloud Photos
You’ve found the same picture twice, but one copy might be an edited export you still need.
Before you remove duplicate photos on Mac, check where the copies live and whether they serve the same purpose. Photos library items and files in a Finder folder need different handling.
Start with Photos’ built-in Duplicates collection if your Mac supports it. For pictures kept in ordinary folders, compare the files themselves before removing a copy. A matching name or thumbnail alone isn’t enough.
Back up originals and check sync before removing anything
Keep a completed copy that won’t disappear with a synced deletion. Apple’s photo-library backup guidance recommends a local backup even when you use iCloud Photos.
A second device showing the same synced library is not that independent copy.
- If you use Time Machine, complete a backup before starting. Check its latest-backup date and time, rather than assuming an ongoing backup has finished. The Time Machine backup guide explains setup and completion checks.
- Check whether your originals are actually on the Mac. With Optimize Mac Storage, full-resolution originals can remain in iCloud while smaller versions are local. Download Originals to this Mac is the option for keeping full-size originals locally. Allow the download to finish before relying on a local library backup.
- If you only need to preserve selected pictures, export their originals to a separate backup destination and verify the copies. Photos provides File > Export > Export Unmodified Original. Apple’s export instructions distinguish this from exporting a resized or converted photo.
- Back up ordinary image folders separately too. Images that Photos references outside its library aren’t included when you copy the library. Referenced-file backup limits matter if you changed how Photos imports files.
If your photo library lives on an external drive, don’t put its Time Machine backup on that same storage device. Follow Apple’s backup-drive warning.
If originals haven’t downloaded or you can’t verify the backup, pause the cleanup rather than deleting first.
With iCloud Photos enabled, deleting on one device deletes the photos everywhere you use iCloud Photos. Merge also discards duplicate items, so review the choice before confirming it.
In iCloud Shared Photo Library, deleting a photo or video removes it from all participants’ devices. Only the person who added the item can permanently delete it before 30 days have passed.
Agree with the other people involved before changing shared pictures. Apple’s Shared Library rules explain these consequences.
Deleted library items normally remain in Recently Deleted for 30 days. You can permanently delete personal-library items sooner, while Shared Library items follow the contributor restriction above.
There is also an important iCloud storage-limit exception: if you exceed your iCloud storage limit, deleted photos and videos are removed immediately and aren’t available there for recovery. Keep the independent backup first.
Shared Albums handle deletion differently. Photos deleted from them are removed immediately, so save a wanted copy to your personal library first. Apple’s shared-album warning covers this separate case.
How to merge duplicate photos in Photos
Photos has a built-in Duplicates feature on macOS Ventura 13 and later. The Ventura Photos guide calls it a sidebar album.
The current Photos guide places Duplicates under Utilities and uses a different Merge label. The procedure below follows that current layout.
- Open Photos and make sure you’re viewing the library you intend to clean up.
- In the sidebar, open Utilities > Duplicates. If Utilities is collapsed, hold the pointer over it and click its disclosure arrow. On older supported versions, click Duplicates directly in the sidebar.
- If you use iCloud Shared Photo Library, choose Both Libraries from the Library pop-up menu in the toolbar, as described in Apple’s duplicates procedure. Check whether the displayed items are shared before continuing.
- Start with one group. Compare its pictures and any edits or details that matter to you. Leave the group alone if you want to keep distinct versions or can’t decide.
- Select the duplicate items you intend to merge. Click Merge [number] Items, then confirm the same action in the dialog. In the Ventura layout, the button is Merge [number] Duplicates. Read the count and prompt on your installed version.
- Check the remaining picture in the library. Make sure it opens and is the version you meant to keep before processing more groups.
Merging leaves one original photo or video where the duplicates were. Discarded duplicates normally go to Recently Deleted, subject to the iCloud storage-limit exception above. The merge result is different from deleting every selected picture.
If a crop, edit, or format is important to you, preserve it separately instead of assuming Merge will keep every variation.
If Duplicates is missing or still finding items
A missing or empty Duplicates collection doesn’t prove that every image on the Mac is unique. Photos analyzes the selected library, and duplicate detection takes time depending on its size.
It doesn’t turn your Downloads folder into a Photos library search.
- Check your macOS version first. On Ventura 13 or later, expand Utilities if your Photos layout has that section. Earlier supported layouts show Duplicates directly in the sidebar.
- If you recently imported pictures, allow time for library analysis and check again later. Don’t use a fixed waiting period as proof that detection has failed.
- If the pictures are in another Photos library, open that library deliberately using the steps in the FAQ below. If they are ordinary Finder files, use the separate file-review method.
- On older systems such as High Sierra or Monterey, don’t expect this Ventura-era built-in Duplicates control. Review library pictures manually in Photos, or review ordinary files in Finder. There’s no need to install an unsupported system upgrade just for this task.

For manual review in an older Photos version, keep the backup in place and compare pictures inside the app. Leave uncertain pairs unchanged.
Use the Photos deletion guide for the library-versus-album distinction before deleting individual items. Don’t search inside the library package to remove files yourself.
How to review duplicate image files in Finder
Finder is useful for pictures in Downloads, a project folder, or an export folder. Its searches collect matching files, but a saved search does not establish that their contents are identical.
Smart Folders are lists based on criteria, not automatic duplicate detectors.
Keep this method outside the Photos library package. Some files outside the package can also be referenced by Photos.
Moving or renaming a referenced file can stop Photos locating it, as explained in Apple’s referenced-file guidance. Preserve it if you aren’t sure how it is used.
Check cloud sync before moving anything to the Trash. If the folder is in iCloud Drive, including synced Desktop or Documents folders, deleting a synced file also deletes it on other devices using that account.
A copy in another synced folder is not an independent backup.
- Start with a folder of personal pictures you recognize and have backed up. Avoid a whole-disk deletion search or system and app-support folders.
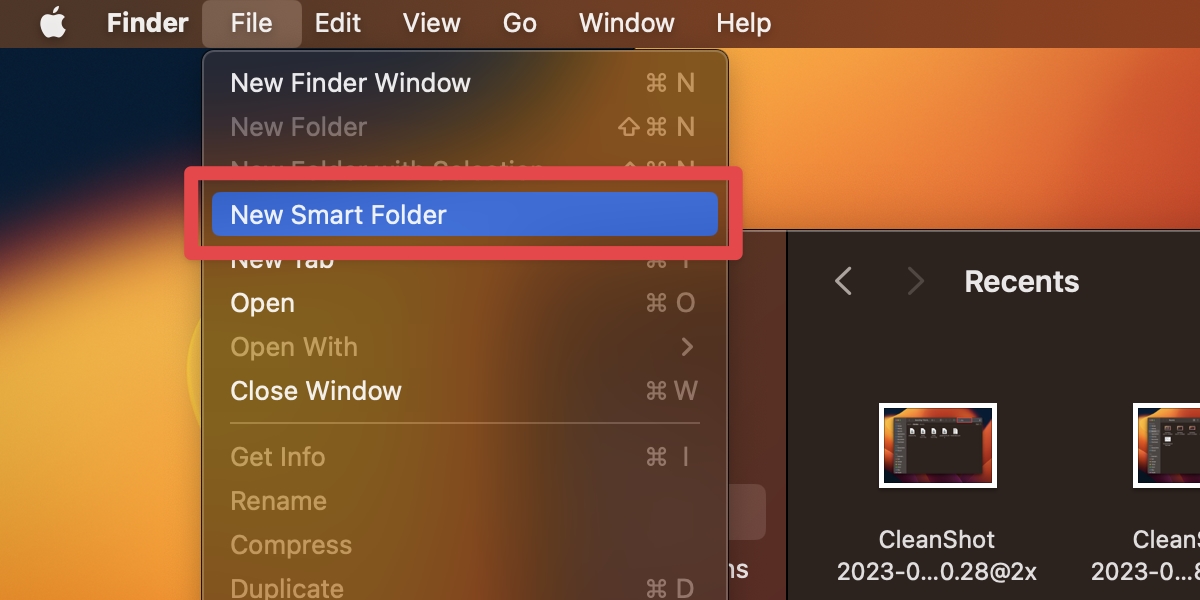
- To keep a review list, choose File > New Smart Folder in Finder. Use the + button to add a rule for image files, and check the search location before reviewing the results. Save the search only if you want to reuse it.
- For each suspected pair, choose File > Get Info and inspect its type, size, and location. Use View > Show Path Bar to see the actual folder. Finder’s information controls help distinguish an export, an original, and a backup.
- For trusted personal images, open or preview both and compare the content, dimensions, crop, and edits. File size, matching names, or the word “copy” alone don’t prove that one is disposable. Don’t launch unfamiliar apps, installers, or scripts to classify them.
- Keep the version you need and its verified backup. Move only the specifically reviewed extra files to the Trash, leaving uncertain files unchanged. Reopen the kept images from their expected folders to check the result.
Don’t use a name-is-“copy” rule as a removal rule. It can miss duplicate files with unrelated names and include a file whose name happens to match.
Different exports may also have different quality or formats, which Photos export settings let you choose deliberately. Keep those differences if they matter.
Leave the Trash intact while checking your choices. Emptying the Trash permanently deletes every item inside, not just the photo files you reviewed. Before emptying it, review all its contents and restore anything you need.
If you need a clearer folder structure for the pictures you keep, the Finder organization guide continues that task.
Organization and duplicate removal are separate decisions, so you don’t have to delete anything to make the folder easier to browse.
Find copies in ordinary photo folders with MacKeeper
MacKeeper’s Duplicates Finder scans selected ordinary folders and groups identical copies, similar photos and screenshots for review. Use it to compare image files stored outside Photos. For items inside a Photos library, use Photos’ merge controls and keep file-cleanup scans outside the library package.
See MacKeeper’s Duplicates Finder offer for reviewing ordinary image folders. Full feature access is paid. Check the system requirements, install the app and use the selected-folder workflow below; the vendor’s Duplicates Finder guide documents its scan and review controls.
Keep the scan outside the Photos library package. Review similar photos separately from identical copies so edited versions are not discarded.
- Open MacKeeper and choose Duplicates Finder > Custom Scan. Select only the ordinary image folder you intend to review, then click Start Scan.
- Clear automatic selections before deciding what to remove. The vendor’s review instructions describe deselecting Auto-selection to uncheck the listed items. If your version differs, stop until you can see and control every selected item.
- Open a result group and review each copy’s preview and location. Check Duplicates separately from Similar Photos and Screenshots. Similar pictures or screenshots may be intentionally different and worth keeping.
- Select only reviewed files you no longer need, with the wanted version and independent backup preserved. Click Remove Selected, read the confirmation and confirm only that selection.
- The documented removal sends selected files to the Trash. Check the kept files before any permanent deletion, and don’t use Check All as a substitute for reviewing them.
Automatic selection can include pictures you still want, so make the final choice yourself. If a tool cannot show you what it selected and where the files live, leave the results unchanged.
Check what remains and recover mistakes promptly
After a small batch, check the pictures you kept before continuing. In Photos, look at the remaining library item. For Finder or MacKeeper removals, open the kept file from its intended folder.
Keep your backup until you’re satisfied you have the versions you wanted.
- For discarded Photos items still available for recovery, open Utilities > Recently Deleted. Expand Utilities if needed. If it’s locked, click View Album and follow the unlock prompt. Select the items and click Recover. Apple’s recovery steps cover this procedure.
- For Finder items still in the Trash, select the file and choose File > Put Back, or drag it back to its original folder. Finder’s restore controls apply before permanent removal.
- If the item is already permanently deleted or unavailable because of the iCloud storage-limit exception, stop deleting and check your independent backup. Recovery is not guaranteed.
Recently Deleted and Finder’s Trash are separate places. Don’t empty either just to make this process feel finished.
If you intentionally choose Delete All in your personal library’s Recently Deleted collection, it permanently removes every item there, including unrelated pictures.
Early permanent deletion of Shared Library items remains limited to the person who added each item. Permanent Photos deletion is a separate action from Merge.
Frequently Asked Questions
Can I merge several duplicate groups at once?
Yes. Photos lets you select multiple rows of duplicates and merge them together. Review those groups first and preserve the versions you need.
Command-A selects all duplicates in the collection, so use it only if you intend to include every group. Apple’s multiple-group controls explain that selection.
Does Photos also find duplicate videos?
Yes. Photos’ Duplicates collection includes duplicate videos as well as photos.
Review a video’s content before merging its group, especially if you keep edited versions. Apple’s duplicates guide covers both media types.
Do I need to delete an album to remove its duplicate photos?
No. Deleting an ordinary album removes the album while its photos and videos remain in the library.
Removing a picture from an ordinary album also leaves the library item.
Use the library’s Duplicates collection for merging, and keep Smart Albums separate from ordinary albums. Apple’s album controls explain these different actions.
Are an original and an exported JPEG safe to treat as duplicates?
Not automatically. An export can use a different format, size, or quality from the original, so decide whether you still need both.
Photos offers Export Unmodified Original separately from its configurable export command. Compare the versions before deleting either. Apple’s export options explain those choices.
How do I check duplicates in a different Photos library?
Open the intended library first, then use its Duplicates collection. Quit Photos, hold Option while opening it, select the library, and click Choose Library.
Back up each library before changing it. Don’t change which library is the System Photo Library just to inspect duplicates. Apple’s library-switching steps distinguish these operations.
Why did exporting one Live Photo create an image and a video?
Exporting a Live Photo in its original format creates two files: a still image and a video.
That pair is expected, so don’t delete one merely because both share a name or show the same moment. Apple’s Live Photo export describes the two-part result.
Affiliate disclosure: MacBook Journal may earn a commission when you buy through links on this page, at no extra cost to you.
How helpful was this article?
Your feedback helps us improve our guides.