Mac Camera Not Working Featured Image

Mac Camera Not Working? 20+ Easy Ways to Fix It

Written by

Reviewed by

Last updated: August 27, 2023

Expert verified

SVG Image

Your Mac’s camera can be a bit moody at times. One minute you’re ready to shine in a virtual meeting, and the next, your Mac’s camera decides to take an unexpected day off. Trust me, I’ve been there.

But, it’s usually not some cosmic joke rather a minor hiccup that’s stopping your camera from making its appearance. In this guide, I’ll decode the most common culprits behind your Mac camera not working and arm you with solutions to put you back in the spotlight. So, let’s dive in and charm that camera back into action.

Before We Begin

Malware can cause hardware and software malfunctions on your Mac, including issues with your Mac’s camera. Scanning your Mac for malware with MacKeeper’s Antivirus can help unveil hidden issues affecting the camera’s functionality. 

Why Is Your Mac’s Camera Not Working?

When your trusty Mac’s camera throws a curveball and decides not to cooperate, it’s natural to wonder what’s up. Before you start questioning the universe, let’s break down the common reasons for your Mac camera not working:

  1. 🛑 Software Interference: Sometimes, an app or a software update might interfere with the camera. It could hog the camera, preventing other apps from accessing it.
  2. 🔄 Multiple Apps Vying for Attention: If multiple applications that use the camera are open simultaneously, they might compete for its attention, leaving you with a frozen or black screen on Mac.
  3. ⏳ Outdated Software: Running an outdated macOS or app version can cause compatibility issues, leading to camera glitches.
  4. 🔒 Privacy Settings: macOS has strict privacy protocols. If the camera access is accidentally disabled for specific apps, it won’t function in those.
  5. 🛠️ Hardware Issues: While less common, physical issues with the camera can occur, especially if your MacBook has faced any trauma or damage.
  6. 💻 Camera Process Hang: At times, the background process (VDCAssistant) that manages the camera might hang, leading to non-functionality. Restarting this process often resolves the issue.
  7. 🚹 User Profile Conflicts: Rarely, specific user profiles on the Mac might encounter issues accessing the camera due to corrupted preferences.

Now that you’ve identified the usual suspects, it’s time to troubleshoot and restore your camera’s swagger. Read on, and I’ll guide you through!

How to Test the Camera on a Mac

Navigating your Mac, you might notice there’s no Camera app or specific camera settings in System Settings for testing purposes. But there’s a handy workaround to check if your Mac camera is working.

Here’s how to check your Mac camera’s functionality:

  1. Navigate to the Applications folder in Finder.
click applications in the left sidebar
  1. Here, search for the Photo Booth app and launch it by double-clicking its icon.
double click the photo booth app to launch it
  1. Upon opening, your Mac’s camera should activate automatically.
camera in photo booth app
  1. If you spot your face on the screen, congrats! Your Mac’s camera is up and running.

How to Fix a Mac Camera Not Working

It’s always unsettling when trusted tech plays up, especially something as essential as your Mac camera. But before you let the stress levels rise, try some simple troubleshooting steps to fix the Mac camera not working issue.

1. Check the Mac Camera Permissions

Often, camera problems stem from apps not having the necessary permissions to access it. Ensuring the right permissions can be a game-changer. Here’s a step-by-step guide for checking the Mac camera permissions:

  1. Click the Apple logo in the top-left corner of your screen and select System Settings.
click the apple icon and select system settings
  1. Look for the Privacy & Security tab in the left sidebar and click it.
click the privacy security category
  1. In the right pane, scroll down and click Camera.
click camera in privacy and security
  1. You’ll see a list of apps that have access to your camera. Toggle on the app(s) you want to allow access to use the camera.

After ensuring the correct permissions, test the camera again with the desired app to see if the issue is resolved. If not, you might want to explore further troubleshooting methods.

2. Check the Running Apps Using the Mac Camera

Multiple applications cannot simultaneously access your Mac’s camera. So, shut down all camera-reliant apps, such as Skype, Zoom, or Photo Booth. To ensure there aren’t any lingering camera-related processes in the background, you can use the Activity Monitor – Mac Task Manager Equivalent.

Follow these steps to check and close any running apps that use your Mac’s camera:

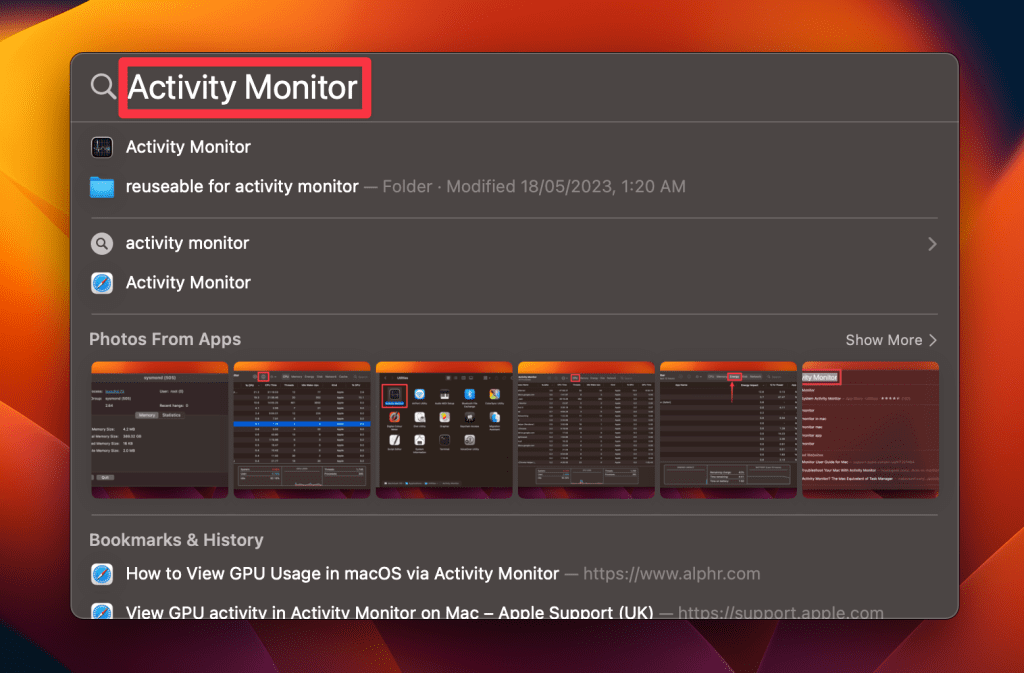
  1. Open the Activity Monitor from your Applications folder or by using Spotlight search (press Command ⌘ + Space and type Activity Monitor).
type activity monitor in spotlight search
  1. In the Activity Monitor, you’ll see a list of active processes, including apps that use your Mac’s camera.
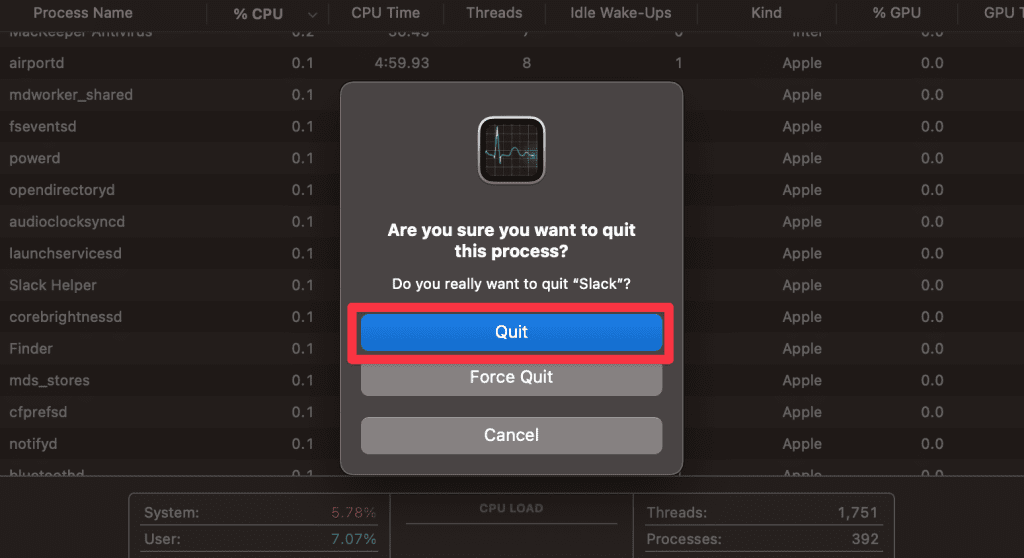
  2. Select the camera-using app you want to terminate by clicking its name.
  3. Click the X button in the window’s top toolbar.
select a camera using app and click cross to close it
  1. Click Quit on the pop-up to terminate the process.
click quit on the activity monitor pop up

3. Force Quit Conflicting Apps

Sometimes, certain apps can hog the camera, preventing others from accessing it. Force quitting these applications can often free up the camera, allowing it to work as intended.

Here’s how to force quit these potentially conflicting apps on your Mac:

  1. Click the Apple logo in the top-left corner of your screen.
  2. Select Force Quit from the dropdown menu.
click the apple icon and select force quit
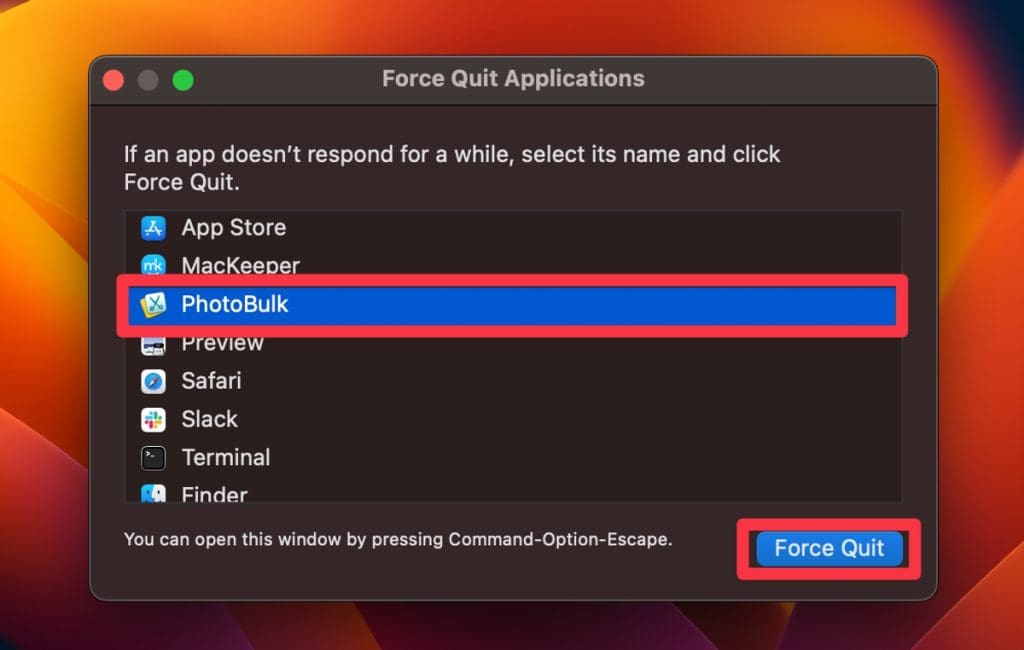
  1. A window will appear with a list of active applications.
  2. Select the application you want to terminate.
  3. Click the Force Quit button at the bottom of the window.
force quit any processes that are causing problems
  1. Confirm that you want to force quit the application, and it will be terminated.
uconfirm by clicking force quit

4. Check if Your Mac Detects the Webcam

Occasionally, your Mac might not even recognize its own built-in webcam, making it essential to verify if the system detects it. Here’s a straightforward method to check this:

  1. Click the Apple logo and select About This Mac.
click apple icon and select about this mac
  1. In the pop-up window that appears, click More Info.
click more info
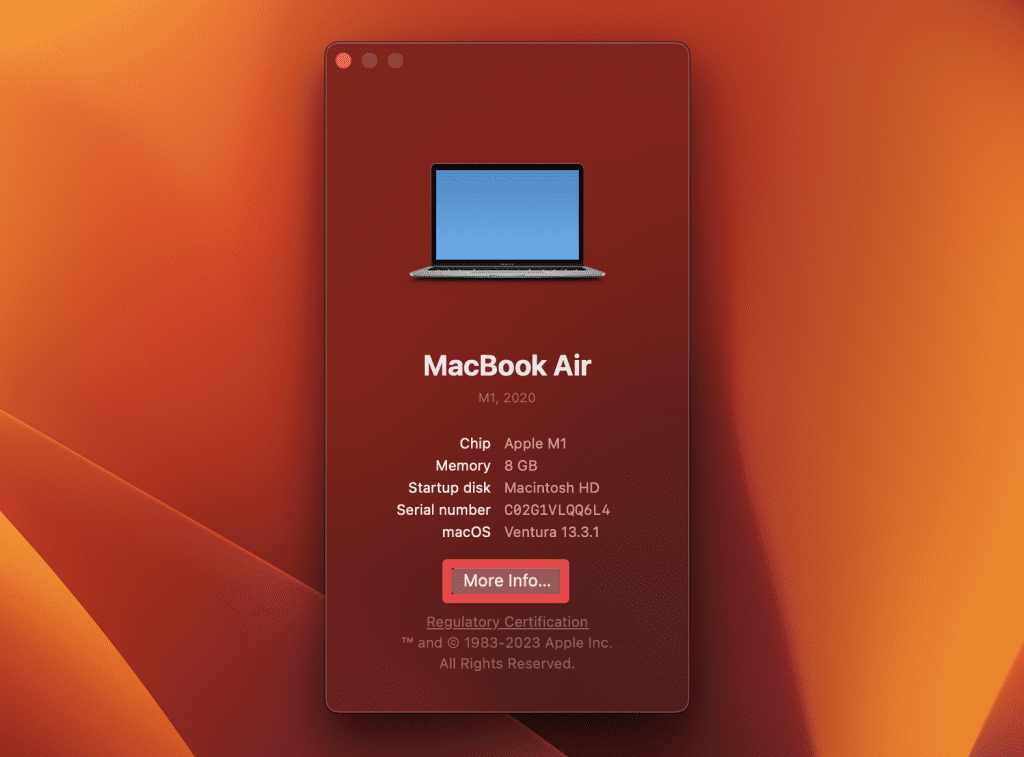
  1. Scroll down the About window and click the System Report button.
click the system report button
  1. Under the Hardware section in the left sidebar, click Camera or USB (based on your Mac model).
  2. On the right side of the window, you should see a list of devices. Look for FaceTime HD Camera.
look for facetime hd camera in camera under hardware

If the camera is listed, your Mac recognizes it, and the issue is likely software-related. If it’s not listed, it might indicate a hardware problem, and you should contact Apple support.

There are times when background processes related to the camera (VDCAssistant) might hang or malfunction. Restarting these processes can often set things straight.

Here’s how to restart camera-related background processes and reset your Mac camera:

  1. Open the Terminal application. You can find it in Finder > Applications > Utilities or by using Spotlight (Command ⌘ + Space) and typing Terminal.
type terminal in spotlight search
  1. Once the Terminal window is open, type the following command and press Enter:
sudo killall VDCAssistant
type sudo killall vdcassistant in terminal
  1. You’ll likely be prompted to enter your Mac’s password to execute the command with administrative privileges.
  2. After entering your password, press Enter again.

Using this command will stop the VDCAssistant process that helps run the camera on your Mac. By killing this process, macOS will automatically restart it, potentially resolving any hiccups it was causing.

6. Adjust Mac Camera Settings

macOS doesn’t have a dedicated camera settings section like some devices. Typically, apps that use the webcam come with their own settings for the camera and a feature to check its functionality.

Take Zoom for instance; you can test and modify your camera’s options within its settings.

Below, I’ve shared the steps to adjust Mac camera settings on Zoom and Skype, the two most common video-calling apps.

To test and tweak camera settings in Zoom:

  1. Launch the Zoom app on your Mac.
  2. Navigate to the Zoom menu and choose Settings.
  3. Click the Video tab in the sidebar.
  4. This section lets you verify if Zoom can access your camera. If using an external webcam, you can pick which camera to activate.

For Skype camera testing and adjustments:

  1. Open Skype.
  2. Head to the Skype menu and pick Audio & Video settings.
  3. This section lets you select the inbuilt or an external webcam.

7. Restart, Update, or Reinstall the Problematic App

Sometimes, the culprit isn’t the camera or the macOS, but the specific app you’re using. Application glitches, outdated versions, or corrupted installations can all impact camera functionality.

Here’s how to tackle a problematic app responsible for your Mac camera not working properly:

  1. Close the app in question. If it’s unresponsive or seems glitchy, consider force-quitting it.
  2. Once closed, reopen the app and test the camera again. A simple restart of the application can sometimes clear minor glitches.
  3. If the issue persists, check for updates. Go to the App Store and click the Updates tab. Look for any available updates for the app and install them.
click updates in the left sidebar

Alternatively, you can use MacKeeper to update your Mac apps automatically. Here’s how:

  1. Download and install MacKeeper.
  2. Launch MacKeeper and click the Update Tracker tab in the left sidebar.
click update tracker under performance
  1. Click Scan for Updates.
  1. MacKeeper will scan your Mac for outdated apps and display a list. To select an app, check the little box next to it or click Check All to select all apps.
select individual apps or click check all
  1. Click Update All.
click update all in update tracker
  1. Wait for the updates to complete. This can take a while, depending on the number and size of updates.
wait for the updates to complete
  1. You’ll get an Update Completed notification. Click Rescan if you want to update more apps. 
click rescan to run the scan again

Still no luck? It might be time for a clean slate. Delete the app from your Mac. If you got it from the App Store, you could easily reinstall it from there. If you downloaded it from a website, redownload the latest version from the official site.

After reinstalling, launch the app and check the camera functionality.

8. Select the Correct Camera in the App’s Settings

If you have multiple cameras connected to your Mac or are using virtual camera software, the right camera might not always be automatically chosen by the app you’re using. Ensuring the correct camera selection can resolve issues with your Mac’s camera malfunctioning.

Here’s how to double-check if you’re using the right camera:

  1. Launch the app where you face camera issues.
  2. Navigate to the app’s settings or preferences.
  3. Look for a section labeled Camera, Video, Hardware, or something similar, depending on the app.
  4. In this section, there should be a dropdown menu or a selection list showing available cameras.
  5. From the list, ensure the desired camera (typically FaceTime HD Camera for built-in Mac webcams) is selected.
  6. Save the changes and restart the app to check if the camera is now working correctly.

9. Restart Your Mac

The age-old advice of “turning it off and on again” is oft-repeated for a reason. A simple restart can clear out minor glitches, reset drivers, and provide a clean environment for hardware and software to communicate.

If you haven’t already tried this basic but effective step, here’s how to restart your Mac:

  1. Save any ongoing work and close all applications on your Mac to prevent any data loss.
  2. Click the Apple logo in the top-left corner of your screen.
  3. From the drop-down menu, select Restart.
click the apple icon and select restart
  1. A confirmation dialog will appear, asking if you’re sure you want to restart your Mac. Click the Restart button in the confirmation dialog to initiate the reboot process.
click restart to confirm your decision
  1. Allow your Mac to shut down completely. It will then power back up on its own.

Once your Mac has restarted and you’re back on the desktop, open the app or tool you were having issues with and check the camera functionality.

10. Check Screen Time Settings

With the integration of Screen Time in macOS, certain restrictions can be set, which might inadvertently block access to the camera. It’s a good idea to ensure Screen Time settings aren’t preventing your camera from functioning properly.

Follow these steps to check Screen Time settings on your Mac:

  1. Click the Apple logo and select System Settings.
click the apple icon and select system settings
  1. Click Screen Time in the left sidebar.
click screen time in the left sidebar
  1. Click the Content & Privacy tab on the right.
click the content privacy tab on the right
  1. Select the App Restrictions option.
select the app restrictions option
  1. Toggle on the Allow camera option if it’s not already.
toggle on the allow camera option if its not already
  1. Exit the Screen Time settings, restart your app or Mac, and then test the camera functionality once more.

11. Check for Hardware Problems

Sometimes, the issue may not be software-related at all. It could be a hardware malfunction with the camera itself or the connection points on your Mac.

Before concluding it’s a hardware problem, which might require professional intervention, here are some steps to verify:

  1. Examine the physical camera, especially if you’re using an external webcam. Ensure there’s no visible damage, dust, or obstructions blocking the lens.
  2. If you’re using an external camera, try connecting it to a different USB port. Sometimes, Mac USB ports not working can cause the camera to malfunction.
  3. Test the camera on another computer, if possible. This can determine if the problem lies with the camera itself or with your Mac.
  4. For built-in cameras, gently move the screen back and forth. Sometimes, the camera’s wiring can get pinched, and adjusting the screen can temporarily alleviate this.

Be gentle to avoid causing further damage.

If, after these checks, you suspect a hardware issue, it’s best to consult with Apple Support or visit an authorized service provider. They can offer diagnostics and recommend appropriate repairs or replacements.

12. Check the Camera Indicator Light

The camera indicator light on Macs is an important signifier of camera activity. If your camera isn’t working but the indicator light is on, it might imply an app is using it in the background or there’s a possible malfunction.

Let’s walk through the steps to troubleshoot based on the indicator light:

  1. Observe the indicator light next to your Mac’s camera. If it’s on (usually a green light), but you can’t see any video feed, it indicates an application is using the camera.
  2. Close all apps that could potentially use the camera (e.g., Skype, Zoom, FaceTime, etc.). Check the camera functionality again.
  3. If the light remains on even after closing all potential apps, restart your Mac. This can clear any processes that might be mistakenly accessing the camera.
  4. After the restart, if the indicator light turns on immediately upon booting up or after a short while, there might be a startup item or background service accessing the camera. Check for any suspicious startup programs in System Settings and remove unnecessary login items from your Mac.
  5. If you’ve ruled out software interference and the light still behaves abnormally, it could point towards a hardware or firmware glitch.

13. Make Sure You’re Connected to the Internet

While it might seem unrelated at first, some apps and services require a stable internet connection to access all features, including camera functions. For apps like Zoom, Skype, or FaceTime, an active internet connection is essential for video calls.

Let’s make sure your Internet connectivity isn’t the underlying issue:

  1. Check the Wi-Fi icon in the top-right corner of your screen. If it’s showing an exclamation mark or appears grayed out, there may be connectivity issues.
click the wi fi icon in the menu bar
  1. Try opening a web browser and visiting a website, like Google, to test the connection. If pages are loading slowly or not at all, there’s a problem.
  2. Restart your Wi-Fi router. Unplug it, wait for about 30 seconds, then plug it back in.
  3. Go back to your Mac and reconnect to the Wi-Fi network.
  4. Test the camera app or service again. If it’s an online-based service, ensure you can make calls or start video sessions without hitches.
  5. If your connection remains unstable, contact your internet service provider or check for larger outages in your area.

14. Check External Mac Camera Connections

If you’re using an external webcam with your Mac, the connection between the camera and your computer becomes a critical aspect to monitor. A loose or faulty connection can lead to the camera not working as expected.

Here’s how you can ensure the external camera is connected properly to your Mac:

  1. Inspect the camera’s cable for any signs of wear, tear, or damage. A damaged cable can interfere with the camera’s functionality.
  2. Connect the camera to a different USB or Thunderbolt port on your Mac. Occasionally, individual ports might malfunction or not provide adequate power.
  3. If available, test the camera on another computer to determine if the issue is with the camera or your Mac.
  4. Ensure your external camera is compatible with your Mac’s version of macOS. Some cameras may require specific drivers or software updates to function properly.
  5. If your camera comes with manufacturer software, open it to see if the camera is recognized there. Sometimes, native apps can better detect and troubleshoot their hardware.
  6. Consider using another USB cable (if your camera permits cable replacement) to rule out the possibility of a faulty cable.

15. Create a New User Account

Sometimes, the issue with the Mac camera might be restricted to your specific user account due to corrupted settings or configurations. Creating a new user account can determine if the problem is account-specific. If the camera works fine on the new account, the issue likely resides within settings or files linked to your primary account.

Here’s how to create a new user account on Mac and test the camera:

  1. Click the Apple logo and select System Settings.
click the apple icon and select system settings
  1. Navigate to Users & Groups.
click users and groups in system settings
  1. Click the Add account button under the existing user account to add a new user account.
select add account in the right corner
  1. Enter your Mac’s admin username and password.
  2. In the new window that appears, fill out the required fields, including the account name and password. Also, choose Standard or Administrator for the new account type. Then, click Create User.
write information and click create user
  1. Once the account is created, log out of your current account by clicking the Apple logo and choosing Log Out [your username].
click the apple icon and select log out
  1. Log into the newly created account.
  2. Open an app like FaceTime or Photo Booth to test the camera’s functionality.
  3. If the camera works on the new account, it indicates the problem is specific to your original user account. This could be due to corrupted preferences, settings, or application configurations.

16. Scan Your Mac for Malware

While macOS is generally considered secure, it’s not completely immune to malware and viruses. Malicious software can sometimes cause various hardware and software malfunctions, including issues with your Mac’s camera.

Scanning your Mac for malware might uncover hidden issues affecting the camera’s functionality. Here’s how to run a virus scan on your Mac using MacKeeper:

  1. Download and install MacKeeper.
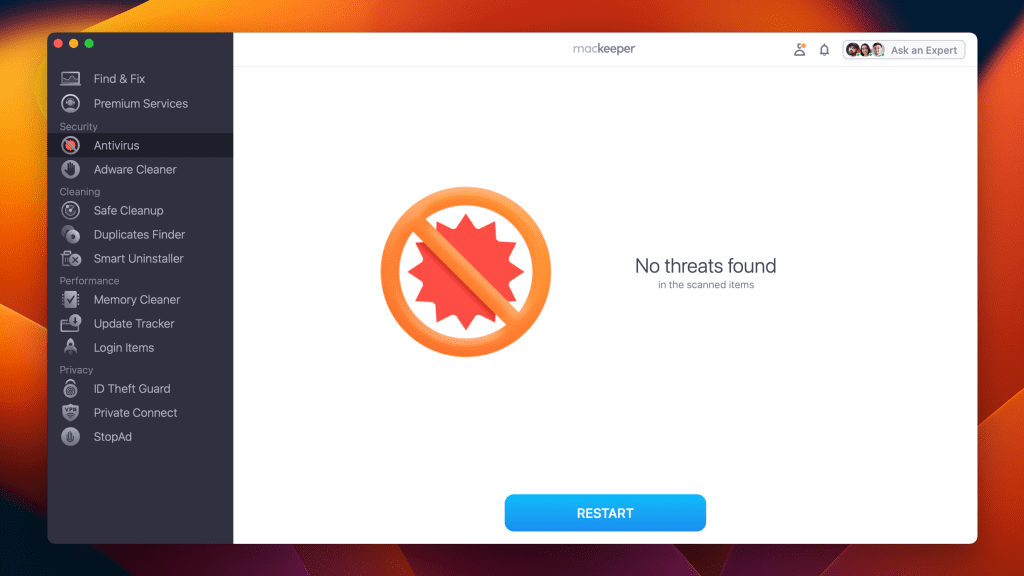
  2. Launch MacKeeper and navigate to the Antivirus tab in the left sidebar.
click antivirus under the security section
  1. Initiate an instant virus scan by clicking the Start Scan button.
click start scan in mackeeper antivirus
  1. If any viruses are detected during the scan, click the Fix Items button to resolve the issues.
  2. If your system is threat-free, you’ll see a No threats found message. You can tap the Restart button to run the scan again.
no threats found in mackeeper antivirus
  1. Enable real-time antivirus protection to safeguard your Mac from future threats by clicking the Enable button.
click enable to allow real time protection

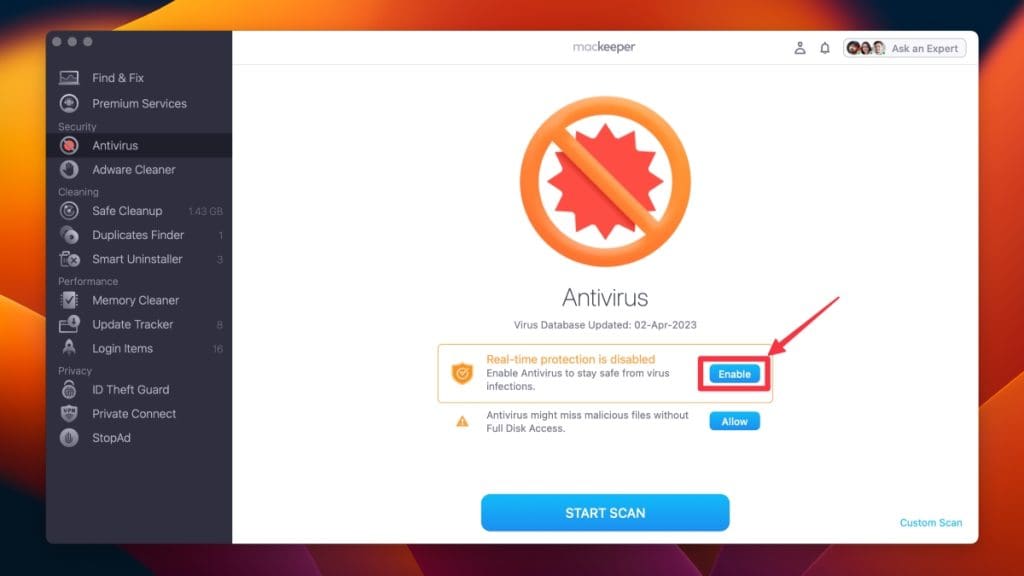
Once you have configured your security settings, MacKeeper will continue to operate in the background, diligently scanning for threats and actively blocking any malicious activity.

What Else Can MacKeeper Do?

Besides running a virus scan on your Mac and updating your Mac apps, MacKeeper can clear cache files on your Mac, remove login items, and delete duplicate files. Check out my detailed MacKeeper review to learn about these features.

17. Change Your Antivirus Settings

Modern antivirus software is built to safeguard you from a wide range of threats. Occasionally, this protective instinct can interfere with legitimate operations on your Mac, such as using your camera.

Here’s how to adjust these settings to troubleshoot the camera:

  1. Open your antivirus software and navigate to its settings or preferences section.
  2. Look for sections related to privacy, permissions, webcam, or camera access.
  3. If there are any settings that block or restrict camera access, try disabling or adjusting them. For instance, some antivirus software has Webcam Protection or similar features that can prevent unauthorized access to your camera.
  4. Save the changes and restart your Mac to ensure the changes take effect.
  5. Once your Mac boots up, test the camera again using an application like FaceTime or Photo Booth.

18. Update Your macOS

Operating system updates are essential for introducing new features, fixing known bugs, and improving system stability. An outdated macOS can sometimes be the reason behind various issues, including those with the camera.

To update your macOS, follow these steps:

  1. Click the Apple menu and select System Settings from the drop-down menu.
click the apple icon and select system settings
  1. Click General and select Software Update.
click general and select software update
  1. If any updates are available, click Update Now to install them.
click the update now button

19. Reset SMC on Mac

The System Management Controller (SMC) is responsible for many low-level functions on Intel-based Mac computers. These functions include managing battery management, system performance, LED lighting, system sleep and wake, and camera functionality.

If you’ve tried other troubleshooting steps and your camera still isn’t working, resetting the SMC might be a good option. Here’s how to reset the SMC on your Mac:

a. With a Removable Battery

  1. Shut down your Mac
click the apple icon and select shut down
  1. Remove your MacBook’s battery.
remove macs battery
  1. Press and hold the Power button for 5 seconds while the battery is removed.
press and hold the power button on your mac
  1. Release the Power button and reinstall the battery.
reinstall macs battery
  1. Turn on your Mac by pressing the Power button.
press and hold the power button on your mac

b. With Non-Removable Battery

  1. Tap the Apple icon and select Shut Down from the drop-down menu.
click the apple icon and select shut down
  1. Press and hold the Shift ⇧ + Control ^ + Option keys with the power button for 10 seconds.
macbook air power shift control option keys
  1. Release all the keys and press the power button to turn on your MacBook.

Once you’ve reset the SMC, test the camera again to see if the issue has been resolved.

20. Reset Your Mac’s NVRAM

NVRAM, or Non-Volatile Random-Access Memory, is a small section of your Mac’s memory that stores certain settings in a place that macOS can access quickly. These settings include sound volume, display resolution, startup disk selection, and more.

Occasionally, you might need to reset the NVRAM if you’re experiencing issues with these functions or others, like camera troubles. Resetting NVRAM is a simple procedure and could potentially solve the problem.

Here’s how to reset the NVRAM/PRAM on your Mac:

a. On Macs With Intel Processors

  1. Turn off your Mac.
  2. Press the power button to turn on your Mac.
macbook air touch id
  1. Press and hold the Option ⌥ + Command ⌘ + P + R keys simultaneously on your Mac’s keyboard before the gray screen appears.
macbook air option command p r keys
  1. Keep holding the keys until your Mac restarts and you hear the startup chime twice. If you have a Mac with the T2 Security Chip, keep holding the keys until the Apple logo appears and disappears twice.
  2. Release the keys and let your Mac start up normally.

b. On Macs With Apple Silicon Processors

On M1 and M2 Macs, resetting the NVRAM is basically a thing of the past. These advanced models automatically check and reset the NVRAM as needed during a restart—no complex key combinations required!

So, if you think your Mac’s NVRAM needs a reset, all you have to do is shut it down and power it back on.

Now, test your Mac’s camera to see if the reset resolved the issue.

21. Run Apple Diagnostics

Apple Diagnostics is a built-in tool that checks your Mac for hardware issues, including those related to the camera. If you’ve attempted multiple software-based solutions and the problem persists, there’s a chance that it might be hardware-related.

Running Apple Diagnostics can provide you with insight into any potential hardware malfunctions and suggest solutions or next steps. Here’s how to run Apple Diagnostics on your Mac:

a. On Apple Silicon Mac

  1. Disconnect all peripheral devices except the keyboard, mouse, Ethernet, display, and power cable.
  2. Turn off your Mac.
  3. Turn on your Mac and continue holding the power button until the startup options screen with the Options icon appears.
startup options screen
  1. Press the Command ⌘ + D keys.
Press the Command D keys

On Intel-Based Mac

  1. Disconnect all external devices except the keyboard, mouse, Ethernet, display, and power cable.
  2. Shut down your Mac.
click the apple icon and select shut down
  1. Press the power button and immediately press and hold the D key on your keyboard until a list of languages appears.
Press the power button and D
  1. Select a language, and Apple Diagnostics will start automatically.
select a language touse apple diagnostics
  1. You’ll see a report listing issues detected when the test completes. If you see an error message or reference code, note it and contact Apple Support or an authorized Apple service provider for further assistance.
report listing any issues detected
  1. Then, click Restart or Shut Down.
click Restart or Shut Down

22. Reboot Your Mac in Safe Mode

In Safe Mode, macOS will run a check on your startup disk, preventing certain software and drivers from loading. This process can sometimes resolve conflicts that prevent components, such as the camera, from working correctly.

Here’s how to boot your Mac in Safe Mode and see if it fixes the camera issue:

a. Apple Silicon Macs

  1. Click the Apple icon and choose Shut Down from the drop-down menu.
click the apple icon and select shut down
  1. Wait for your Mac to shut down completely, and press the Power button turn it on.
macbook air touch id
  1. Keep holding the Power button until you see the Loading startup options screen.
loading startup options screen on mac
  1. Select a volume from the options.
select a volume
  1. Press and hold the Shift ⇧ key and click Continue in Safe Mode.
macbook air shift key
  1. Your Mac will restart automatically, and you will see Safe Boot in the menu bar when the login screen appears.
safe boot mode on mac

b. Intel-Based Macs

  1. Restart or turn on your Mac and press and hold the Shift ⇧ key immediately.
macbook air shift key
  1. Keep holding the Shift ⇧ key until you see the login screen.
  2. Release the Shift ⇧ key and log in to your Mac.
  3. You may be asked to log in again.
  4. You’ll see Safe Boot in the menu bar on your first or second login window.
safe boot mode on mac

If the camera works in Safe Mode but not in the regular mode, it indicates a potential software conflict or bad cache files affecting its performance. In such a case, you might need to look at recently installed software or drivers that could be causing the conflict.

Get Your Mac’s Camera Working Again

From the simple steps of checking app permissions and restarting your Mac to more advanced techniques like resetting the NVRAM or running Apple Diagnostics, there are plenty of ways to fix a Mac camera that doesn’t work.

Here are a few more tips for you:

Frequently Asked Questions

  1. How do I open the camera on Mac?

    To open the camera on a Mac, you can use the built-in Photo Booth app. Navigate to the Applications folder and locate Photo Booth, then double-click to open it. The app will automatically activate your Mac’s camera, allowing you to see the live feed.

  2. How do I turn on the camera on Mac?

    To turn on the camera on Mac, you generally don’t need to enable it manually. Simply open an application that requires camera access, such as FaceTime or Photo Booth, and the camera will activate automatically. If the camera doesn’t turn on, make sure to check your app permissions in System Settings under Privacy & Security.

  3. How do I reset the Mac camera?

    To reset the Mac camera, you can try quitting all camera-using apps and relaunching the one you need. For a deeper reset, open Terminal and type sudo killall VDCAssistant, followed by your password. This will restart the camera-related processes. Restarting your Mac can also help in resetting the camera.

Hashir Ibrahim

Author

I'm Hashir, a tech journalist with a decade of experience. My work has been featured in some of the top tech publications like MakeUseOf and MakeTechEasier. I have a bachelor's degree in IT, a master's in cybersecurity, and extensive knowledge of Apple hardware, specifically MacBooks. As the senior writer at MacBook Journal, I write in depth guides that help you solve any issues you have with your mac and unbiased reviews that help you make the right buying decisions.

Ojash

Reviewer

Hi there! I'm Ojash, a tech journalist with over a decade of experience in the industry. I've had the privilege of contributing to some of the world's largest tech publications, making my mark as a respected Mac expert. My passion lies in exploring, using, and writing about MacBooks, and I enjoy sharing my expertise to help others make informed decisions and get the most out of their MacBook experience. Join me as we delve into the fascinating world of MacBooks together!

Total
0
Shares
You May Also Like