TL;DR
To delete Other Volumes in a container on Mac, follow these steps:
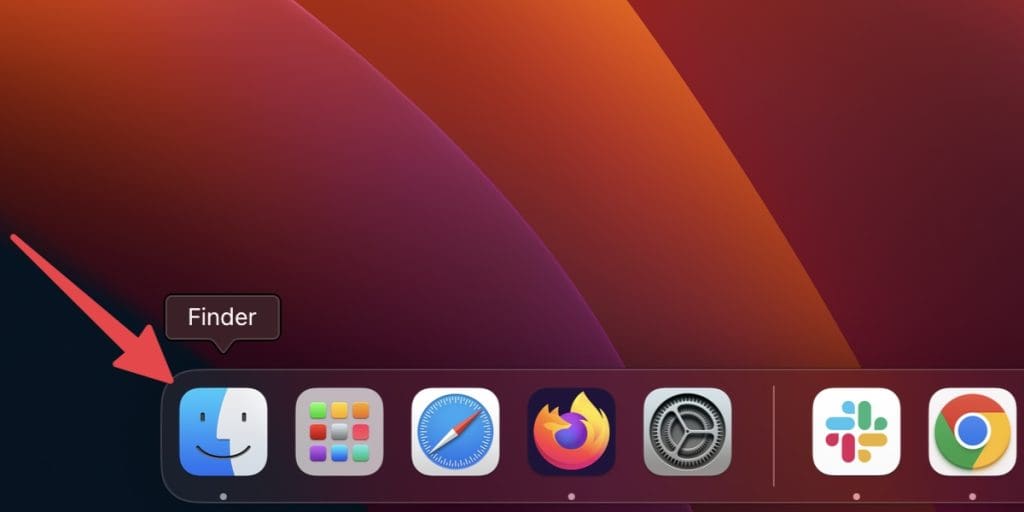
- Open the Finder application.
- Click Go in the menu bar and select Computer.
- Look for any volumes that you don’t recognize or don’t need.
- Once you’ve identified the unnecessary volumes, note their names and sizes.
Tried and Tested ✅: The methods and steps mentioned in this article have been tried and tested firsthand by Ojash Yadav on his MacBook Pro M3 and rechecked for errors on Hashir’s MacBook Air M2.
I’ve dealt with the tricky ‘Other Volumes in a Container’ issue and found effective fixes through trial and error. This guide covers simple adjustments to advanced solutions.
What Is Other Volumes in Container Mac?
On a Mac, ‘Other Volumes in Container’ is a hidden part of your storage. It’s part of the APFS (Apple File System) that started with macOS High Sierra. In this system, your Mac’s single hard drive is split into several ‘containers’ and each container can hold multiple ‘volumes’.
How to Delete Other Volumes in a Container on Mac
Why You Can Trust MacBook Journal ![]() We always conduct first-hand research and verify every method or solution we present, ensuring you receive reliable and effective advice. Learn more about our process.
We always conduct first-hand research and verify every method or solution we present, ensuring you receive reliable and effective advice. Learn more about our process.
Other Volumes in a Container are essential for your Mac but can take up too much space. I’m going to show you how to clean them safely, so you don’t mess up your Mac.
Before deleting other volumes in a container, you must understand that it can have serious implications if not done correctly. So, backup your Mac data and know what each volume contains.
1. Identify Unnecessary Volumes
To manage ‘Other Volumes in a Container,’ identify unnecessary volumes. Check each one carefully—some may be old backups or unused data. Here’s how:
- Open the Finder application.
- Click Go in the menu bar and select Computer.

- Look for any volumes that you don’t recognize or don’t need.

- Once you’ve identified the unnecessary volumes, note their names and sizes.
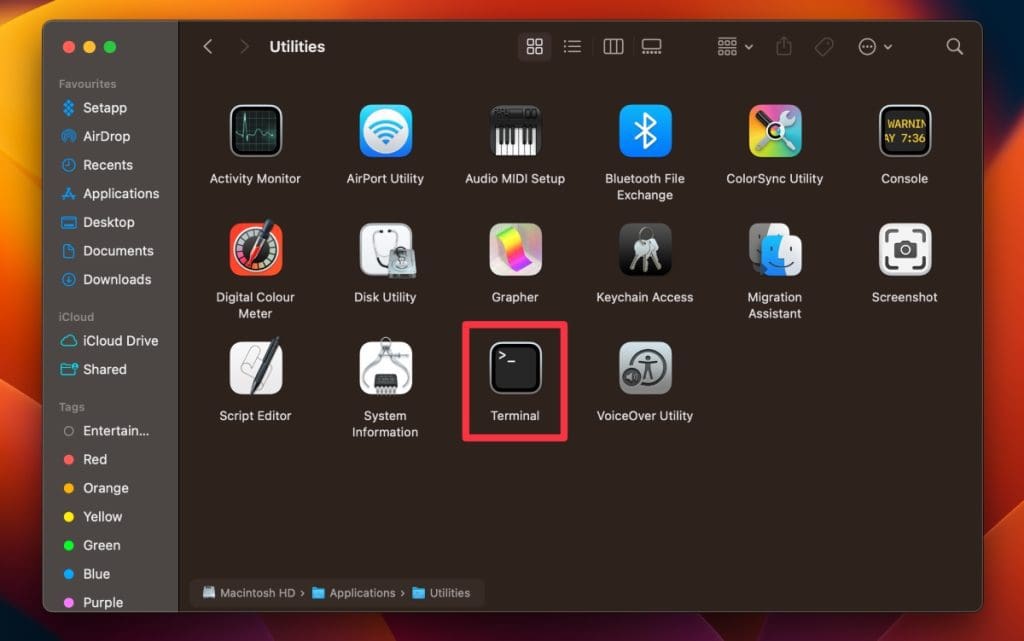
2. View Volumes Using Terminal
I use Terminal on my Mac to view all volumes, including hidden ones. It helps identify unnecessary volumes and understand space usage. Follow these steps to view volumes on your Mac using Terminal:
Using Terminal requires technical proficiency, as incorrect commands can have significant consequences.
- Launch Terminal from Finder > Applications > Utilities.
- Type the following command and press Enter:
diskutil list
- Read the output under APFS Container Scheme.

- If you see an unusually large Other Volumes entry or notice an odd one, you can take further steps to fix the issue.
Back up your Mac data and understand the purpose of the entry before deleting it.
3. Use Disk Utility to Delete Volumes
After identifying which volumes are unnecessary, I use Disk Utility to delete them. This tool is built into macOS and is pretty user-friendly. Now, follow these steps to delete volumes using Disk Utility:
Double-check that you’re erasing the correct volume, as this action can’t be undone.
- Open Disk Utility by searching for it in Spotlight or going to Applications > Utilities > Disk Utility.

- Select the Container that contains the unnecessary volume.

- Select the volume you want to delete and click the Erase button in the toolbar.

- Confirm that you want to delete the volume by clicking Erase again.

- Once you’ve deleted the unnecessary volumes, you should see increased available storage space on your Mac.
4. Turn Off Content Caching
Content caching saves updates locally but can take up space. Turn it off to free up storage. Here’s how:
- Go to the Apple menu and select System Settings.
- Click General and select Sharing.

- In the Sharing settings, toggle off Content Caching.

- After toggling it off, close the System Settings window, and your changes will be saved automatically.
5. Reinstall macOS to Delete Other Volume
If other methods fail, erase your hard drive and reinstall macOS to resolve the ‘Other Volumes in Container’ issue. Here’s how to reinstall macOS on your Mac:
Erasing your drive to reinstall macOS will delete all the data on your hard drive. So, it’s essential to back up all important files and documents before proceeding.
- Use Time Machine to back up your data and ensure you don’t lose any important files.
- Boot your Mac into Recovery Mode by pressing and holding the Command ⌘ + R keys on startup.

- From the Utilities window, select Disk Utility and click Continue.

- Click the view icon and select Show All Devices to see all volumes on your device.
- Select your system volume from the sidebar of Disk Utility and click the Erase button in the top bar.

- Choose the APFS or Mac OS Extended (Journaled) format. Use Macintosh HD as the name for the volume and click Erase to delete the volume and remove all data.

- Control-click any old volumes in the Container that you want to delete and select Delete APFS Volume to remove them, keeping only the newly erased Macintosh HD volume.
- Quit Disk Utility and return to the Utilities window.
- Click Reinstall macOS and follow the prompts to reinstall the operating system.

- Wait until the installation is complete. Then, set up your Mac and check if the issue is resolved before transferring or migrating any data.
7 Quick Tips for Managing Other Volumes
Managing ‘Other Volumes in a Container’ on my Mac taught me some effective tips for keeping things tidy and smooth. Here are some of my tried and true tips for managing Other Volumes on your Mac:
- 🔎 Regularly Check Your Volumes: Review your Mac’s storage to remove old, unnecessary files.
- 💾 Always Back Up: Always back up important data before making changes.
- 🛠️ Use the Built-in Tools: Manage storage, add, delete, or resize volumes easily.
- 📅 Keep Your Mac Up-to-Date: Keep your Mac updated for security and storage fixes.
- 🚫 Don’t Overdo Volumes: Create new volumes only when necessary to avoid clutter.
- ☁️ Consider Cloud Storage: Store infrequently used files in iCloud or similar services.
- 🚀 Optimize Your Volumes: Defragment volumes periodically to boost performance.
Delete Other Volumes in Container Mac
Deleting Other Volumes can free up storage but requires caution. Here are safer ways to save space:
- Delete duplicate files on your Mac to free up storage space.
- Optimize your storage by deleting unnecessary downloads on Mac.
- Find, merge, and delete duplicate photos on Mac to save up space.