TL;DR
To check storage space on your Mac:
- Click the Apple icon in the top-left corner.
- Select About This Mac.
- Click More Info.
- Scroll down to the Storage section to view total and available storage.
Tried and Tested ✅: The methods and steps mentioned in this article have been tried and tested firsthand by Ojash Yadav on his MacBook Pro M3 and rechecked for errors on Hashir’s MacBook Air M2.
Running out of storage is a common problem for many Mac users, especially if your device is a bit older. In this post, I’ll share the simple steps I use to check storage and free up space to keep my Mac running smoothly. Let’s dive in!
Before We Begin
Besides unnecessary data and unused applications, duplicate files can also eat up valuable storage on your Mac. Using MacKeeper, you can effortlessly locate and remove these redundant files. MacKeeper even identifies photos that may look similar but aren’t exact duplicates, allowing you to free up more space with ease.
How to Manage Storage Space on Mac with MacKeeper
1. Uninstall Unnecessary Applications
Uninstalling unnecessary applications is an effective way to free up valuable storage space on your Mac. Over time, you may accumulate apps you no longer use or need. Removing these can not only declutter your system but also improve its overall performance.
You can use MacKeeper to uninstall unwanted apps on your Mac. Here’s how:
- Download and install MacKeeper on your Mac.
- After installation, launch MacKeeper and click the Smart Uninstaller in the left-hand menu.

- Click Start Scan.

- Select the applications you want to delete from the list and click Remove Selected.

- Tap the Remove button on the pop-up to confirm the deletion.

- MacKeeper will uninstall the apps and remove associated files and folders. You will get a Removal Completed notification. If you want to scan your Mac again, click Rescan.

2. Clear Cache and Temporary Files
Cache and temporary files are often generated by apps and browsers to speed up tasks but can accumulate over time, unnecessarily hogging disk space. Regularly removing them can maintain your system’s health and efficiency.
MacKeeper offers an easier way to remove cache and junk files from your Mac. You don’t have to find the files manually, preventing accidental deletion of important files. Here’s how to use MacKeeper to clear cache on your Mac:
- Download and install MacKeeper on your Mac.
- Launch MacKeeper and go to the Safe Cleanup tab.

- Click Start Scan and wait for the results.

- Review the items you want to remove. Select them individually or click Check All.

- Next, click Clean Junk Files.

- This will clear temp files on Mac, and you’ll get a Cleaning Completed notification on your screen. Click Rescan to repeat the process.

3. Manage Startup Items
Startup items are applications, services, or tasks that automatically launch when you boot up your Mac. While some of these are essential for system performance, others can drain your system resources, leading to a slower startup time.
An easy way to remove login items on your Mac is using MacKeeper. Follow these steps to get rid of unnecessary login items on your Mac:
- Download MacKeeper and install it on your Mac.
- Open Login Items under Performance in MacKeeper.

- Click Start Scan.

- Select unnecessary items from the list and click Remove Selected Items.

- Tap the Remove button on the pop-up.

- It will remove your selected items from the system startup list. You can click Rescan to repeat the process.

4. Find and Delete Duplicate Files
Duplicate files are sneaky storage hogs that can accumulate over time. These could be multiple copies of the same photo, document, or even applications. Not only do they consume valuable disk space, but they can also make your file system messy and confusing.
You can use MacKeeper’s Duplicates Finder to find and delete duplicates on your Mac. Follow these steps to delete duplicates on your Mac using MacKeeper:
- Download and install MacKeeper on your Mac.
- Open MacKeeper on your Mac and click Duplicates Finder in the left sidebar.

- Click Start Scan.

- Select a folder in the left menu to review duplicate files before deletion.

- Alternatively, you can click Check All and tap the Remove Selected button to remove all duplicate files at once.

- Tap the Remove button on the pop-up to confirm the deletion.

- This will remove the selected files, and you’ll get a Removal Completed message. Click Finish to end the process.

What Else Can MacKeeper Do?
Besides uninstalling apps, deleting duplicates, managing login items, and removing junk files on your Mac, MacKeeper has many valuable optimization tools to optimize your Mac’s storage, run a virus scan, and block annoying ads on your Mac. Learn more about its features in my detailed Mackeeper review.
How to Check Storage Space on Your Mac
Why You Can Trust MacBook Journal ![]() We always conduct first-hand research and verify every method or solution we present, ensuring you receive reliable and effective advice. Learn more about our process.
We always conduct first-hand research and verify every method or solution we present, ensuring you receive reliable and effective advice. Learn more about our process.
Let’s explore the different methods you can use to check storage space on your Mac.
1. Via About This Mac
Here’s how to check storage space on your Mac from the About This Mac menu:
- Click the Apple icon in the top-left corner of your screen.
- Select About This Mac from the dropdown menu.
- Click the More Info button on the new window.
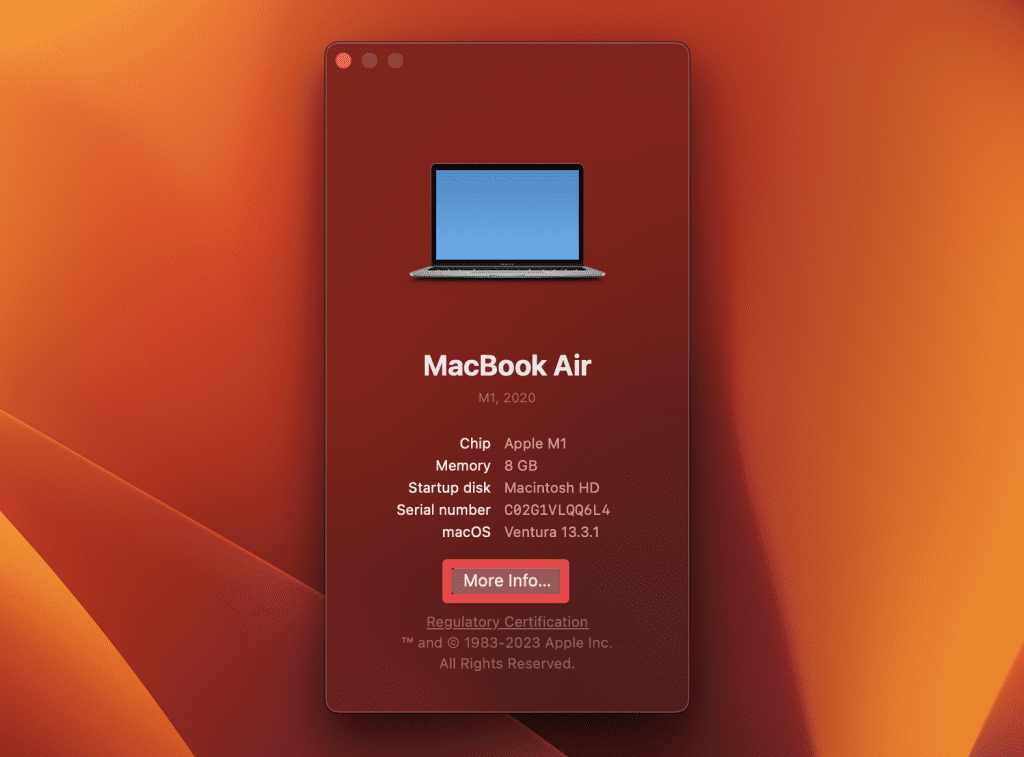
- Scroll down the About window and at the end of the page, you’ll see Storage section.
- Your hard drive will (usually named Macintosh HD) will be listed in this section with total and available storage on your Mac.

- If you want to get a detailed breakdown, click the Storage Settings… button.
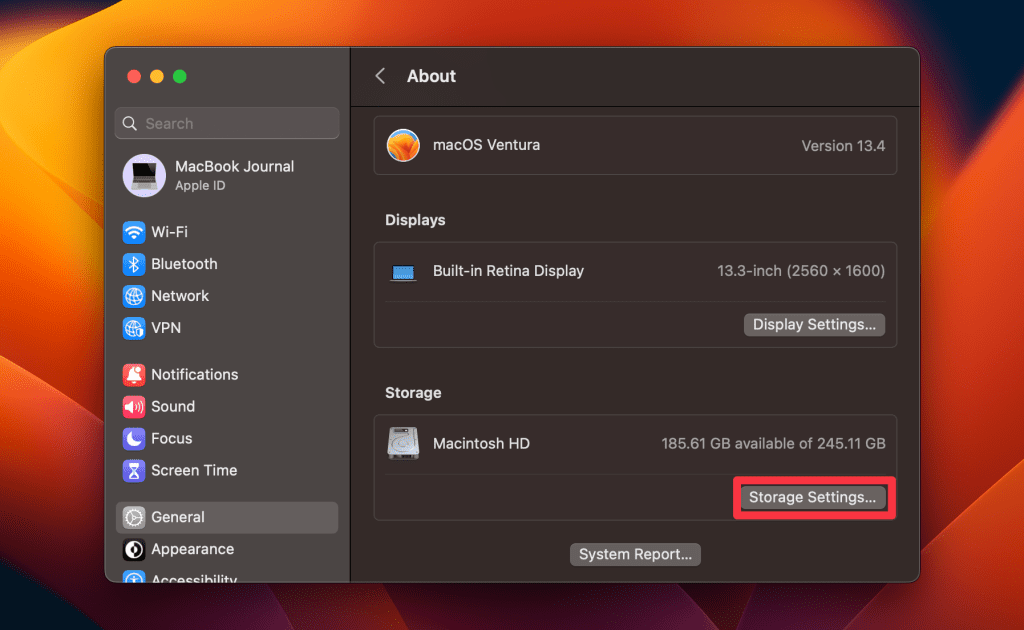
- Navigate to the Storage section on the new window.

Here, you’ll see a graphical representation of your storage use, breaking it down into various categories like Apps, Bin, Other Users, macOS, and System Data.
2. From System Settings
Follow these steps to check storage space on your Mac via System Settings:
- Click the Apple icon in the top-left corner of your screen.
- Choose System Settings from the dropdown menu.
- Click General and select Storage.

- Here, you’ll see a graphical representation of your storage use.
- Click the All Volumes button next to your hard drive.

- It will give you a detailed breakdown of various categories like Apps, Bin, Other Users, macOS, and System Data. You’ll also see the space occupied by Other Volumes on your MacBook.

3. Via Storage Status Bar
Here’s how to enable the Storage Status bar and use it:
- Open any Finder window.
- Navigate to the View menu in the menu bar.
- Choose Show Status Bar.

- The bottom of your Finder window will now display a status bar, which includes the available storage on the device you’re currently viewing—usually your Mac’s primary drive.

4. From the System Information
Here’s how to access System Information to check storage space on your Mac:
- Launch Finder on your Mac.
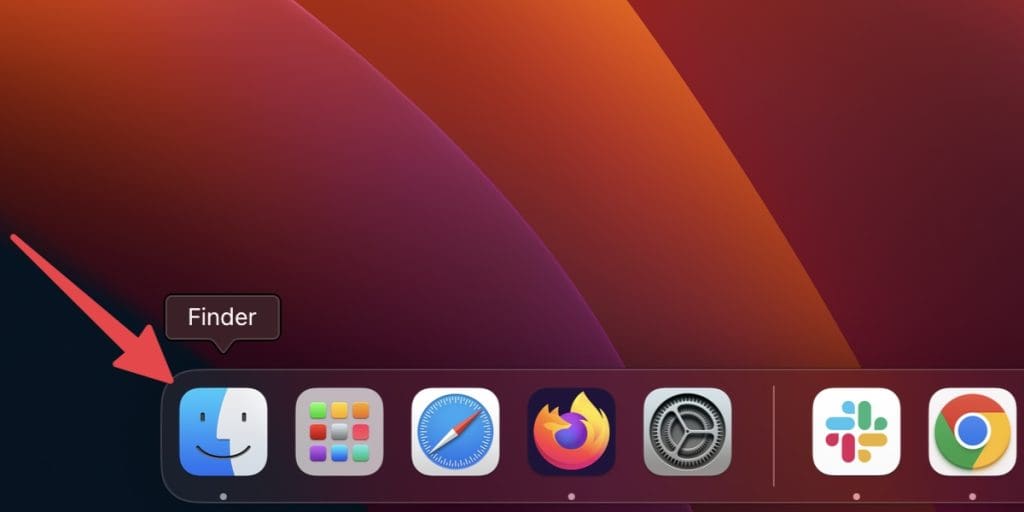
- Click Applications in the left sidebar and open the Utilities folder.
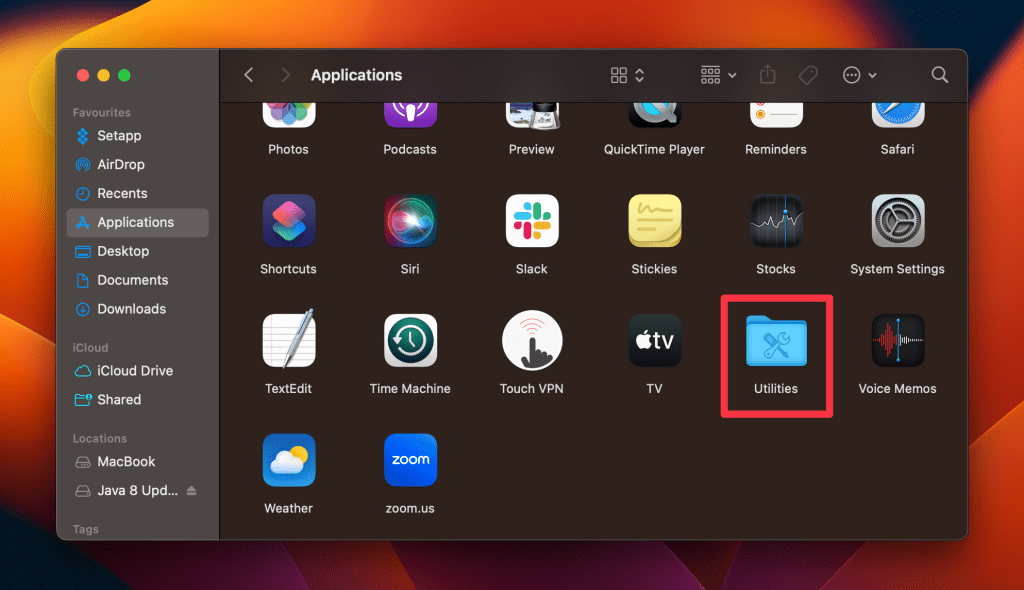
- Double-click the System Information app.

- In the System Information window, look for the Storage option in the sidebar under the Hardware section.
- Click on it to reveal in-depth details about your storage devices. You’ll see the available capacity and how much space each partition is using, among other details.

5. Using Disk Utility
Here’s the step-by-step guide to use Disk Utility to check storage space on your Mac:
- Launch Finder on your Mac.
- Click Applications in the left sidebar and open the Utilities folder.
- Double-click the Disk Utility app to open it.

- In the Disk Utility window, you’ll see a list of drives and their associated partitions on the left sidebar.
- Select your primary drive, usually named Macintosh HD. The main panel will display various details about the selected drive, including its total capacity, available, and used space.

6. Running a Terminal Command
Follow these steps to use Terminal to check storage space on your Mac:
- Open Terminal by typing Terminal in Spotlight search (Command ⌘ + Spacebar).

- Once the Terminal window is open, type the following command and press Enter:
df -h
- The command will display a detailed list of mounted volumes along with their storage details, such as total size, used space, and available space. The columns are generally self-explanatory, but what you’ll most likely focus on is the line that refers to your main disk, usually identified as /dev/disk1s1 or similar.

This method is ideal for power users, system administrators, or anyone comfortable with command-line operations. It’s a quick and potent way to keep tabs on your storage without additional software.
How to Manage Storage in macOS
Knowing how much storage space you have left on your Mac is only half the battle. The real trick is efficiently managing that space to ensure optimal system performance and ease of use. Below, I’ve shared effective tips to manage your storage space on Mac:
- 🛠️ Optimize Storage Feature: Use macOS’s Optimize Storage tool to store files in iCloud and automatically clear the Trash. This helps manage space and keep your Mac running efficiently.
- 🗑️ Uninstall Unnecessary Applications: Remove unused apps via Finder or MacKeeper’s Smart Uninstaller. This frees up storage and ensures leftover files are also deleted for a complete cleanup.
- 🧹 Clear Cache and Temporary Files: Clear cache and temporary files manually via Finder to automate the process and prevent wasted space.
- 💾 Move Files to External Storage: Transfer large or rarely accessed files to an external drive. This helps free up internal storage and ensures smoother system performance.
- 🗑️ Empty the Trash: Regularly empty the Trash to permanently remove deleted files and reclaim valuable storage space.
- 🚀 Manage Startup Items: Remove unnecessary startup apps via System Settings. This speeds up your Mac’s startup and improves performance.
Check Mac’s Used and Available Space
Now that you know how to check and manage storage space on your Mac, you may want to learn more about making the most of your system resources. Here are a few tips to get you started:
- Clearing Other Storage on Mac can also help free up disk space and improve system performance.
- Regularly clean your Mac to prevent clutter buildup.
- If you’ve tried everything and your disk is still full, consider adding storage to your Mac.