TL;DR
To create macOS Sonoma bootable USB installer:
- In Disk Utility, erase your USB drive as Mac OS Extended (Journaled) with GUID Partition Map, then name it.
- Download the full macOS Sonoma installer from the App Store.
- In Terminal, run the
createinstallmediacommand with your USB drive’s name to create a bootable installer. - Restart, hold Option, select the USB as the startup disk, then follow the installer prompts to install macOS Sonoma.
Tried and Tested ✅: The methods and steps mentioned in this article have been tried and tested firsthand by Ojash Yadav on his MacBook Pro M3 and rechecked for errors on Hashir’s MacBook Air M2.
I’m excited to show you how to create a macOS Sonoma bootable USB. It’s a quick, simple process that makes upgrading or troubleshooting your Mac a breeze. Let’s explore!
Before creating a macOS Sonoma bootable USB installer, you must back up your important files. A backup ensures you don’t lose anything if something goes wrong during a clean install. Follow my detailed guide on how to use Time Machine to back up your Mac.
Things You Need
Before you start, you’ll need a few things. Below, you’ll find what you need to make a macOS Sonoma USB drive:
- 💾 USB Thumb Drive (16 GB or more): You’ll need at least 16 GB of storage to hold the macOS Sonoma installer and any additional files.
- 🍎 macOS Sonoma Installer: Download the full installer from the Mac App Store. Don’t just grab an update—make sure it’s the complete installer.
- 🔐 Administrator Access: You’ll need admin rights on your Mac to run the necessary commands.
- 🌐 Reliable Internet Connection: If you haven’t yet downloaded macOS Sonoma, you’ll need a stable connection to avoid incomplete downloads.
- ⏳ Some Free Time: Plan for at least an hour to cover downloading, formatting the drive, and creating the USB installer.
Consult my macOS compatibility checker and check the macOS version system requirements before downloading it.
How to Create macOS Sonoma Bootable USB Installer
Why You Can Trust MacBook Journal ![]() We always conduct first-hand research and verify every method or solution we present, ensuring you receive reliable and effective advice. Learn more about our process.
We always conduct first-hand research and verify every method or solution we present, ensuring you receive reliable and effective advice. Learn more about our process.
Below, I’ll show you how to create a macOS Sonoma bootable USB installer, ensuring you’re well-equipped for your macOS installation.
Step 1: Format the USB Drive
Follow these steps to format a drive on your Mac:
- Plug your USB flash drive into an available USB port on your Mac.
- Navigate to Finder > Applications > Utilities > Disk Utility.

- In Disk Utility, you’ll see a list of drives on the left. Click your USB flash drive’s name (not the partition name, but the main drive name).
- Click the Erase button at the top.

- In the dialog box that appears, give your USB drive a name, like SonomaInstaller.
Keep in mind, when you use the createinstallmedia command later, replace the placeholder MyVolume with the actual name you’ve given to your drive in this step.
- For the format, choose Mac OS Extended (Journaled) if your Mac uses HFS+ or APFS if it uses the newer APFS file system.
For bootable macOS installers, Mac OS Extended (Journaled) is commonly used.

- If given an option for Scheme, choose GUID Partition Map.

- Click the Erase button to format the USB drive. This will delete all data on the drive, so ensure you’ve backed up any important files.
- Once the process is finished, your USB drive will be formatted and ready for the macOS Sonoma installer.
Step 2: Download macOS Sonoma Installer
- Ensure you have a stable and reliable internet connection, as the installer can be several gigabytes in size.
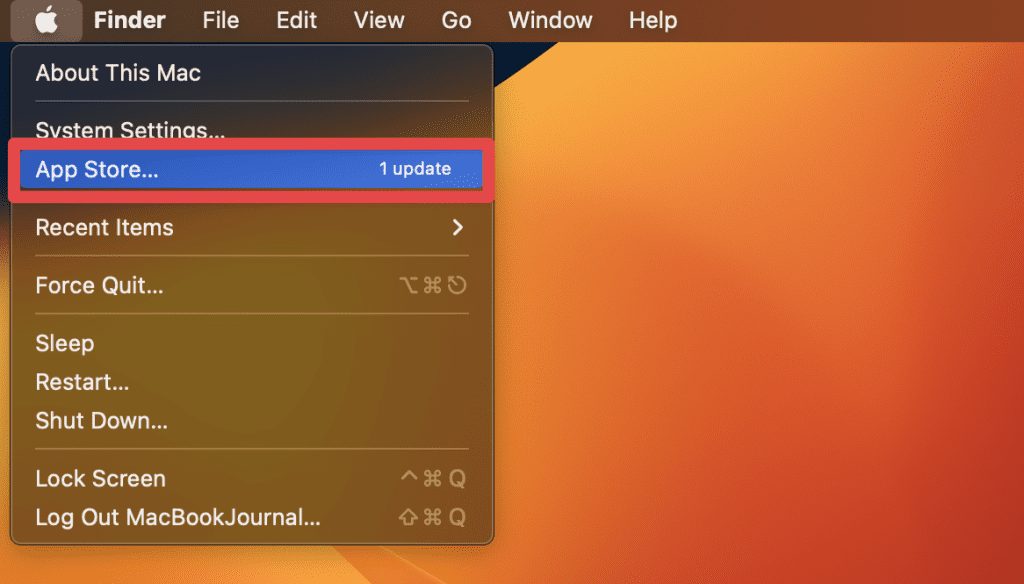
- Click the Apple menu in the top-left corner and select App Store.
- In the App Store’s search bar, type macOS Sonoma.

- Locate and open the macOS Sonoma entry in the search results.

- Click the Get button next to macOS Sonoma. Depending on your Mac’s settings, you might be prompted to enter your Apple ID and password to continue.

- The download process might take a while, depending on your internet speed. You can monitor the progress in the Purchases or Updates tab of the App Store.
- Once downloaded, the macOS Sonoma installer will automatically launch. You can quit the installer if you’re not ready to install yet. The installer application will be saved in your Applications folder, named something like Install macOS Sonoma.
Step 3: Create a Bootable USB with Terminal
This approach uses the createinstallmedia command to create a bootable USB for macOS, and it isn’t compatible with OS X 10.6 Snow Leopard or older versions.
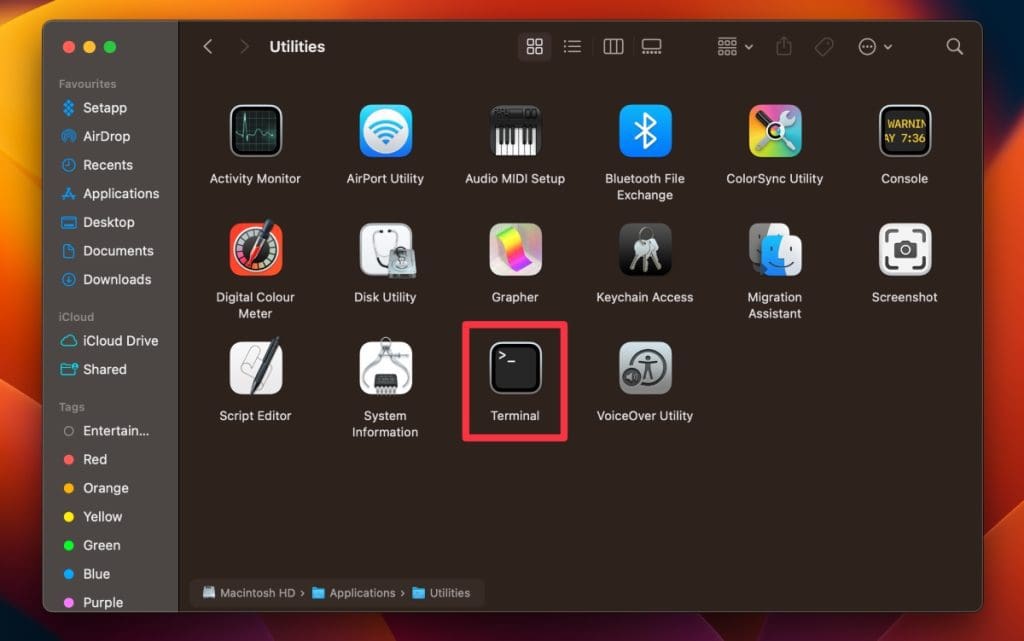
- Open Terminal by navigating to Finder > Applications > Utilities > Terminal.
- Before you input the command, ensure the macOS Sonoma installer is in the Applications folder and has the default name (e.g., Install macOS Sonoma.app). Also, remember the name you gave your USB drive when formatting it.
- In Terminal, type the following command, replacing MyVolume with the name of your USB drive:
sudo /Applications/Install\ macOS\ Sonoma.app/Contents/Resources/createinstallmedia --volume /Volumes/MyVolume- After entering the command, press Enter.
- You’ll be prompted to enter your admin password. Type it in and press Enter again.
Note: You won’t see the characters as you type the password, but Terminal is registering them.
- Terminal will inform you that it will erase the drive. To confirm you want to continue, type Y and press Enter.
- Terminal will now create the bootable macOS Sonoma installer on the USB drive. This process can take some time, so be patient.
- After the procedure finishes, the USB drive will be renamed Install macOS Sonoma and you can use it as a bootable installer.
Step 4: Install macOS on Your Startup Disk
Now that you have created macOS Sonoma bootable USB, you can easily install or upgrade macOS on your Mac. Here’s how:
- Connect your bootable macOS Sonoma USB drive to your Mac using a USB port.
- Click the Apple menu and select Restart.
- Click Restart on the prompt to confirm your action.

- Press and hold down the Option ⌥ key immediately after restarting your Mac. Keep holding it until you see the Startup Manager screen.
- Use the arrow keys on your keyboard to select the bootable macOS USB drive as your startup disk. This will boot your Mac into Recovery Mode.
- Next, click Install macOS Sonoma and tap the Continue button.
- It will start installing macOS Sonoma on your Mac. After the process, your Mac will restart with a clean installed macOS Sonoma.
How to Update Your Mac to macOS Sonoma
Before starting, ensure your Mac is compatible with macOS Sonoma from Apple’s official compatibility list.
Here’s how to update your Mac to macOS Sonoma:
- Always back up your data before any major update. Use Time Machine or your preferred backup method to safeguard your files.
- Ensure you have a stable and reliable internet connection, as the update will be downloaded from the Internet.
- Click the Apple menu in the top-left corner and select System Settings.
- In the System Settings window, click General in the left sidebar and select Software Update in the right pane.

- If macOS Sonoma update is available, you’ll see an Upgrade Now button next to the update’s name.
- Click the Update Now button to start downloading macOS Sonoma.

- Once the download is complete, the macOS installer will automatically launch.
Your Mac may restart multiple times during the installation.
- After the restart, your Mac might ask you a few setup questions. Answer them, and you’ll be guided to your updated macOS Sonoma desktop.
Why Is Your macOS Sonoma USB Not Bootable?
If your macOS Sonoma USB isn’t bootable, there could be several reasons behind it. Let’s explore some common issues and their potential causes:
- 🔄 Improper Creation Process: If the bootable USB drive wasn’t created correctly or any step was missed during the creation process, it might not work as intended.
- 💾 Corrupted Installer: The macOS Sonoma installer you downloaded could be incomplete or corrupted. Always download the installer from a reliable source, preferably directly from Apple.
- 🖥️ Faulty USB Drive: The USB drive might be damaged or faulty. Trying a different USB drive can help determine if this is the issue.
- ❌ Unsupported Mac: Not all Mac models might support macOS Sonoma. Ensure your Mac is on the list of compatible devices for this OS version.
- 🚫 Insufficient USB Capacity: The USB drive should have enough storage space to accommodate the macOS Sonoma installer. Typically, a drive with at least 16 GB is recommended.
- 📁 Incorrect File System Format: The USB drive needs to be formatted correctly, usually as Mac OS Extended (Journaled) or APFS, for the bootable process to work.
- ⚙️ BIOS/UEFI Settings: On some older Macs or when trying to boot on non-Mac hardware, the BIOS or UEFI settings might need adjustments to recognize and boot from the USB drive.
- 🔄 Outdated Firmware: Sometimes, outdated firmware on your Mac can prevent it from recognizing or booting from external drives. Ensure your Mac’s firmware is up to date.
- 🔌 USB Port Issues: The USB port you’re using might be malfunctioning. Try plugging the USB drive into a different port or another Mac to see if the issue persists.
- 📂 Missing Boot Files: Essential boot files might be missing from the USB drive, making it non-bootable. This can happen if the creation process is interrupted or files are accidentally deleted.
Boot Your Mac into macOS Sonoma With a Bootable USB Installer
Having a macOS Sonoma bootable USB ensures a smooth upgrade and a quick troubleshooting option. By following these steps, you’ve safeguarded your Mac and sharpened your tech skills.
Here are a few more tips for you:
- Any macOS version requires sufficient disk space, so free up space on your Mac hard drive before doing anything else.
- If your backup drive isn’t appearing, try a different port, use another drive, reformat, or boot your Mac in Safe Mode.
- Sometimes, your Mac refuses to recognize your USB or external hard drive due to malfunctioning ports. If your Mac USB ports are not working, fix them first.