How to Safely Transfer Files from Mac to Mac Featured Image

How to Safely Transfer Files from Mac to Mac: 11 Best Ways

Written by

Reviewed by

Last updated: September 11, 2023

Expert verified

SVG Image

Sharing files between Macs is like a secret handshake for efficiency. Whether you’re a seasoned Mac maestro or just getting started, mastering safe file transfers is a must and this guide is your backstage pass to seamless sharing.

In this guide, I’ll show you the ropes, making file transfers a breeze. So, let’s dive in and unlock the secrets to transfer files from Mac to Mac to take control and make your Macs work in perfect harmony.

Before We Begin

Before you start transferring files from your old Mac to the new one, make sure you only transfer what you truly need. This saves the transfer time and storage space on your new Mac. Use MacKeeper to clean up junk, duplicates, and unnecessary apps. Once that’s done, you’re good to go for the transfer!

Why Would You Need to Transfer Files from Your Mac?

Transferring files from your Mac serves various purposes, from data protection and sharing to improving organization and efficiency in your digital life. Here are the most common reasons why you might need to transfer files from your Mac:

  1. 💾 Backup and Recovery: Creating backups of important files helps safeguard against data loss due to hardware failures or accidents.
  2. 🆕 Upgrading or Replacing Macs: When you get a new Mac or upgrade your existing one, you’ll want to transfer your files, settings, and applications.
  3. 📤 Sharing with Others: Sharing documents, photos, videos, or projects with colleagues, friends, or family members who also use Macs.
  4. 🤝 Collaboration: Working on collaborative projects that require sharing files between team members or colleagues.
  5. 📱Syncing Devices: Synchronizing data between your Mac and other Apple devices like iPhones or iPads.
  6. 🧹 Storage Management: Freeing up space on your Mac by moving files to external drives or cloud storage services.
  7. 🗂️ Organization: Reorganizing your files and folders for better access and management.
  8. 🔄 Migration to a New OS: When upgrading to a new macOS version, you may need to transfer files and settings to the new operating system.
  9. 📊 Data Consolidation: Gathering data from multiple sources into one location for easier access and management.

Before You Start Transferring Files from Your Old Mac to New One

Before you start transferring files from your old Mac to a new one, it’s crucial to take some important preparatory steps to ensure a smooth and successful transition. These initial actions can help you avoid potential hiccups and ensure your data remains secure throughout the transfer.

Here’s what you should consider before you transfer file from Mac to Mac:

💾 Backup Your Old Mac: Begin by creating a comprehensive backup of your Mac’s data. This ensures your files are protected in case of any unexpected issues during the transfer.

🔄 Update macOS: Make sure both your old and new Macs are running the latest macOS version. Updating your macOS can improve compatibility and performance during the transfer.

Your old Mac should be using OS X Lion (10.7) or later.

  • 📦 Check Storage Space: Check your Mac’s storage space and verify that your new Mac has sufficient storage space to accommodate the files you plan to transfer. If necessary, consider upgrading your storage capacity.
  • 🧹 Organize and Clean Up: Before transferring files, take the opportunity to declutter and organize your data. Delete unnecessary files, applications, and duplicates to streamline the process. The best way to do it is via MacKeeper.

Here’s how to delete duplicate files on Mac using MacKeeper:

  1. Download and install MacKeeper on your Mac.
  2. Open MacKeeper on your Mac and click Duplicates Finder in the left sidebar.
click duplicates finder in the left sidebar
  1. Click Start Scan.
click start scan in duplicates finder
  1. Select a folder in the left menu to review duplicate files before deletion.
click an item in the left sidebar
  1. Alternatively, you can click Check All and tap the Remove Selected button to remove all duplicate files at once.
click check all and tap remove selected
  1. Tap the Remove button on the pop-up to confirm the deletion.
click remove on the pop up window in duplicates finder

This will remove the selected files, and you’ll get a Removal Completed message. Click Finish to end the process.

click finish to complete the process

Here’s how to uninstall unwanted apps on your Mac using MacKeeper:

  1. Download and install MacKeeper on your Mac.
  2. After installation, launch MacKeeper and click the Smart Uninstaller in the left-hand menu.
click smart uninstaller in the left sidebar
  1. Click Start Scan.
click start scan in smart uninstaller
  1. Select the applications you want to delete from the list and click Remove Selected.
select the applications you want to remove and click remove selected
  1. Tap the Remove button on the pop-up to confirm the deletion.
click remove on the pop up window in smart uninstaller
  1. MacKeeper will uninstall the apps and remove associated files and folders. You will get a Removal Completed notification. If you want to scan your Mac again, click Rescan.
click rescan in smart uninstaller

What Else Can MacKeeper Do?

Besides removing duplicates and deleting unwanted apps from your Mac, MacKeeper offers many valuable optimization tools to clear the cache, manage login items, and optimize your Mac’s storage. Learn more about its features in my detailed Mackeeper review.

  • 🖥️ Prepare External Storage: If you’re using an external drive for the transfer, ensure it is formatted correctly and has enough space to hold your data. If it’s not, you should properly format a drive on your Mac.
  • 🔌 Gather Necessary Cables or Tools: Depending on the transfer method (e.g., using Migration Assistant or an external drive), make sure you have the required cables or tools ready.
  • 🔐 Note User Accounts and Passwords: If you’re transferring user accounts, ensure you have the associated usernames and passwords on hand.
  • 🚫 Deauthorize Software: Deauthorize any software or services tied to your old Mac, such as iTunes, to prevent any licensing issues.
  • ⚡ Disconnect Devices: Disconnect any peripherals or external devices from your old Mac to avoid complications during the transfer.
  • 🌐 Plan for Internet Connection: If you’re transferring data using cloud services or online accounts, ensure you have a stable Internet connection.

By addressing these preliminary tasks, you’ll be well-prepared to start the file transfer process from your old Mac to your new one, making the transition as seamless and stress-free as possible.

How to Transfer Files from Mac to Mac Wirelessly

In this section, I’ll explore various methods to transfer files from Mac to Mac without the need for cables or external drives. From using Apple’s Migration Assistant for a comprehensive transfer to employing familiar tools like AirDrop and iMessage for quick sharing, I’ve got you covered.

1. Using Migration Assistant

Apple’s Migration Assistant is the trusty ally in your digital transition. This tool simplifies the process of transferring files, apps, and user accounts between Macs, ensuring a seamless and efficient transition.

Below, I’ll walk you through the steps to use Migration Assistant to transfer files from Mac to Mac:

  1. On your old Mac, click the Apple menu in the top-left corner of your screen and select System Settings.
click the apple icon and select system settings
  1. Click General and select Sharing.
click general and select sharing
  1. Take note of your Mac’s name in the Local hostname field.
note your mac local hostname in system settings
  1. If it matches your new Mac’s name, you may want to edit it for clarity. To do that, click the Edit button.
click edit to edit your mac local hostname
  1. Connect both Macs to a power source and an active Wi-Fi connection.
  2. On your new Mac, find the Migration Assistant application by going to Finder > Applications > Utilities > Migration Assistant.
migration assistant in utilities folder
  1. In Migration Assistant, choose the option From a Mac, Time Machine backup, or startup disk to initiate the transfer of your information.
  2. Click Continue to proceed.
  3. On your old MacBook, open Migration Assistant and select To another Mac from the menu.
  4. After clicking Continue, a security code will be displayed. Verify the codes on both Macs match to ensure a secure connection.
  5. Back on your new Mac, select the specific backup you wish to transfer, and click Continue.

2. Using App Store

The App Store isn’t just your go-to destination for downloading the latest apps and games; it can also be a valuable resource for wirelessly transferring apps between Macs. However, this method is limited to apps and games that you downloaded or purchased via App Store.

Here’s how to transfer apps from Mac to Mac using App Store:

  1. Launch the App Store on your new Mac by clicking the Apple menu and selecting App Store.
click the apple menu and select app store
  1. Sign in using the same Apple ID you previously used on your old Mac.
  2. Click your account name in the lower-left corner of the window to see all the apps you bought on your former MacBook.
click your account name in app store

3. Via AirDrop

In wireless connectivity, AirDrop is a simple and efficient way of transferring files between Macs. This Apple-designed feature allows you to quickly send documents, photos, videos, and more from one Mac to another with just a few clicks.

Here’s how to use AirDrop to transfer files from Mac to Mac:

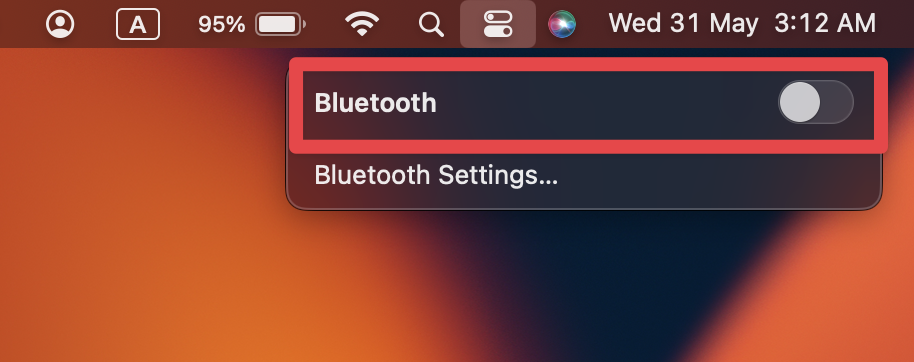
  1. Enable AirDrop on both Macs by clicking the Control Center icon in the menu bar and toggling AirDrop on.
toggle on airdrop in control center
  1. In Finder, select the files you want to transfer.
  2. Right-click the files and click Share in the context menu.
right click the files and click share
  1. Select AirDrop in the submenu that appears.
click airdrop in the window
  1. Choose the receiving Mac’s name from the AirDrop list, and the files will be sent wirelessly.

Alternatively, you can follow these steps:

  1. Open Finder on your Mac and click AirDrop in the left sidebar.
click airdrop in the left sidebar of finder
  1. Find the files you want to transfer.
  2. Drag these files to a contact listed in the AirDrop window.
  3. The receiving Mac will get a notification prompting to confirm the file transfer.
  4. Once confirmed, the transferred files will automatically be saved in the Downloads folder of the receiving Mac.

Both your Macs must be set to be visible to everyone; otherwise, they won’t appear on the list of nearby devices for each other.

4. Using iMessage

While iMessage is known for its lightning-fast text communication, it’s also a hidden gem for transferring files between your Macs. This native Apple messaging app provides an intuitive and convenient way to send a variety of files, including documents, images, and videos, directly from one Mac to another.

Here’s how you can use iMessage to transfer files from Mac to Mac:

  1. Open the Messages app on your Mac, which you can find under the Applications menu or in your Dock.
click the messages app icon in the dock
  1. Initiate a new iMessage conversation with the intended recipient.
  2. Either drag and drop the desired file or folder into the message box or copy and paste it there.
send files via imessage on mac
  1. Press Enter to send the message and the receiving Mac will get your file or folder via iMessage.
  2. On the receiving end, you can save the attachment by right-clicking it and choosing the Save As option.
  3. Finally, save the file or folder in the Downloads folder on the recipient’s Mac.

5. Via Bluetooth Sharing

Bluetooth, the versatile wireless technology connecting our devices, isn’t just for headphones and speakers. It’s also a handy tool for transferring files between Macs. Let’s see how you can use Bluetooth sharing to transfer files from Mac to Mac:

  1. Enable Bluetooth on both Macs in the System Settings or via Control Center.
toggle on bluetooth in control center
  1. Confirm that Bluetooth Sharing is enabled on the sending MacBook. To do this, navigate to Finder > Applications > Utilities, and double-click Bluetooth File Exchange.
double click bluetooth file exchange in utilities folder
  1. In the Bluetooth File Exchange window that appears, select the files you wish to send and click the Send button.
click the send button in bluetooth file exchange window
  1. After you initiate the sharing, a Bluetooth connection window will open that lets you interact with the Public folder of the receiving Mac, as well as upload and download files.
  2. A Connection Request prompt will appear on the receiving Mac. Click the Connect button to establish the connection.
  3. The Bluetooth connection window on the sending MacBook will update to show that a successful connection with the receiving Mac has been made.
  4. On the receiving Mac, a new window will pop up asking if you want to accept the incoming files.
  5. To store the files on your receiving Mac, click the Accept button.

6. Using iCloud Storage

iCloud, Apple’s cloud storage service, not only keeps your files securely stored in the digital ether but also offers a seamless way to transfer files between your Macs. This cloud-based solution ensures your documents, photos, and more are accessible from anywhere and you can quickly and effortlessly share them between your Apple devices.

Follow these steps to transfer your files from Mac to Mac via iCloud:

  1. Open System Settings by clicking the Apple menu.
click the apple icon and select system settings
  1. Click your Apple ID and select iCloud.
click icloud in apple id
  1. Pick the files you want to sync across devices.
apps syncing to icloud
  1. On your new Mac, go to the System Settings menu, click Apple ID, and select Sign In.
  2. Type in the same Apple ID and password you’re using on your old Mac.
  3. You may receive a verification code on one of your linked devices. Enter the received verification code.
  4. Finally, enable iCloud and any other file storage services you wish to use by navigating to System Settings, selecting Apple ID, and clicking iCloud.

7. Via Email

Email serves as not just a means of sending messages but also a surprisingly effective way to transfer files between Mac computers. Whether you need to share documents, images, or other data, using email for file transfer is a straightforward solution accessible to almost anyone.

Here’s how to use email to transfer files from Mac to Mac:

  1. Open the Mail app on your Mac.
mail app in launchpad
  1. Click the little pencil icon to compose a new email on the old Mac.
click the pencil icon to compose an email
  1. A new window will appear. Click the paperclip icon in the top toolbar to attach the files you want to transfer.
click the paperclip icon to attach files in the email
  1. Send the email to yourself.
  2. Open the email on the new Mac, download the attached files, and save them to your desired location.

8. Using File Sharing

Using macOS’s built-in File Sharing feature is a straightforward and secure method for transferring files between Macs. You can find this option in the Sharing settings and it enables you to share specific files and folders with authorized users or groups on the same network.

Here’s how to transfer files from Mac to Mac using File sharing:

  1. Open System Settings by selecting it from the Apple menu.
click the apple icon and select system settings
  1. Click General and select Sharing.
click general and select sharing
  1. In the Sharing settings, toggle on the File Sharing option.
toggle on the file sharing option
  1. Click the small i next to the File Sharing option.
click the small i next to file sharing
  1. A new window will appear. Here, you’ll see a green indicator next to File Sharing: On and an IP address listed below it. Note down this IP address for later steps.
ip address in file sharing settings
  1. Click the Options button on the file-sharing settings window.
click the options button in file sharing settings
  1. On the new window that appears, check the box for Share files and folders using SMB.
check share files and folders using smb
  1. Your Mac is now set up to share files through SMB.

Now, follow the same steps on your new Mac to configure it for file sharing.

When you’re ready to share files, follow these steps:

  1. Look at the top of the screen to find the name of your Mac.
  2. Share this name with any other Mac on your local network to give it access to your files.
  3. Place the files or folders you want to share into the Public folder that you’ve set up in the System Settings.
  4. The receiving Mac should now be able to access these shared files.

How to Transfer Files from Mac to Mac Using a USB Cable

If you’re a fan of old school methods for file transfer, the USB cable is your friend. You can transfer files from one Mac to another using wires and cables. Below, I’ve shared three methods to transfer files from Mac to Mac using a USB cable.

1. Using External Storage Devices

Transferring files between Macs using external storage devices like USB flash drives or external hard drives is a straightforward and reliable method. This approach is particularly useful when you don’t have a network connection or simply prefer a manual method of transferring files.

Below, I’ll walk you through the steps to use an external storage device for moving your files from one Mac to another:

  1. Insert an external storage device (like a USB flash drive or external hard drive) into the USB port of the source Mac.
  2. Locate the files or folders you want to transfer and drag them into the external storage device icon that should now be on your desktop.
  3. Right-click the external storage device icon and select Eject.
  4. Unplug the external storage device from the source Mac and plug it into the destination Mac.
  5. Open the external storage device on the destination Mac and drag the files or folders to their new location.
  6. Once the transfer is complete, eject the external storage device from the destination Mac and unplug it.

2. With Target Disk Mode

If you’re looking for a fast and efficient way to transfer large volumes of data between two Macs, Target Disk Mode is an excellent option to consider.

This feature essentially turns one of your Macs into an external hard disk for the other, enabling direct access to its file system via a USB connection. It is especially useful if you have compatible hardware and are comfortable with booting your Macs into special modes.

Here’s how to use Target Disk Mode for a seamless file transfer on Macs:

  1. Turn off both Macs and connect them using a compatible USB cable.
  2. Turn on the source Mac and immediately press and hold the T key to enter Target Disk Mode.
  3. On the destination Mac, turn it on and log in. The source Mac’s hard drive should appear as an external drive.
  4. Drag the files or folders from the source Mac’s hard drive to the desired location on the destination Mac.
  5. Eject the source Mac’s hard drive from the destination Mac, then restart both computers.

3. Using Time Machine Backups

When you’re transitioning to a new Mac and want to ensure not a single file is left behind, using Time Machine backups can be your safest bet. This method doesn’t just transfer files; it creates a mirror image of your entire system, from system settings to applications, and moves it to your new computer.

Here’s how to utilize Time Machine backups for a complete and secure data transfer on Mac:

  1. Connect an external storage device to the source Mac and perform a Time Machine backup.
  2. Once the backup is complete, eject the external storage device and unplug it from the source Mac.
  3. Plug the external storage device into the destination Mac.
  4. Open Time Machine on the destination Mac and choose to restore from the recent backup.
  5. Follow the on-screen instructions to complete the file restoration.

Transfer Your Files to Your New Mac

Now that you know how to transfer files from your old Mac to the new one, you’re ready to set up the new Mac and start exploring. Here are a few tips to get you started:

Frequently Asked Questions

  1. What cable do I need to transfer files from Mac to Mac?

    To transfer files from one Mac to another, you can use a Thunderbolt cable if both Macs have Thunderbolt ports. Alternatively, a USB-C cable can be used for newer Mac models with USB-C ports. Older Macs with USB-A ports will require a USB-A to USB-A or USB-A to USB-C cable, depending on the receiving Mac’s port.

  2. What is the fastest way to transfer data from one Mac to another?

    The fastest way to transfer data from one Mac to another is through using Migration Assistant or Target Disk Mode. Both options offer efficient means for moving large volumes of data. Migration Assistant can work over a Wi-Fi network, while Target Disk Mode requires a direct cable connection, typically making it faster for substantial transfers.

  3. Does Migration Assistant transfer everything?

    Migration Assistant can transfer a wide range of data including files, user accounts, settings, and even applications from one Mac to another. However, it may not transfer system files or files that are incompatible with the target Mac’s operating system. Always double-check to ensure all critical data has been moved.

  4. How long does Migration Assistant take?

    The duration of the Migration Assistant process can vary widely based on several factors, including the amount of data being transferred, the speed of the connection method, and the performance of the Macs involved. It can take anywhere from a few minutes for small datasets to several hours for larger ones.

Hashir Ibrahim

Author

I'm Hashir, a tech journalist with a decade of experience. My work has been featured in some of the top tech publications like MakeUseOf and MakeTechEasier. I have a bachelor's degree in IT, a master's in cybersecurity, and extensive knowledge of Apple hardware, specifically MacBooks. As the senior writer at MacBook Journal, I write in depth guides that help you solve any issues you have with your mac and unbiased reviews that help you make the right buying decisions.

Ojash

Reviewer

Hi there! I'm Ojash, a tech journalist with over a decade of experience in the industry. I've had the privilege of contributing to some of the world's largest tech publications, making my mark as a respected Mac expert. My passion lies in exploring, using, and writing about MacBooks, and I enjoy sharing my expertise to help others make informed decisions and get the most out of their MacBook experience. Join me as we delve into the fascinating world of MacBooks together!

Total
0
Shares
You May Also Like